Floating stairs achieve their minimalist aesthetic not by ignoring safety codes, but by mastering the engineering that makes safety an integral, often invisible, part of the design itself.
- Structural integrity relies on a hidden, engineered steel frame within the wall, not on standard timber studs.
- True safety is a function of material science—like a tread’s Coefficient of Friction (COF)—and acoustic decoupling, not just visible add-ons.
- The feeling of openness is a deliberate outcome of “light path engineering,” where the staircase is designed to channel and reflect natural light.
Recommendation: Prioritize structural and material planning with an architect or engineer before construction begins to guarantee a safe, silent, and stylish result that passes inspection.
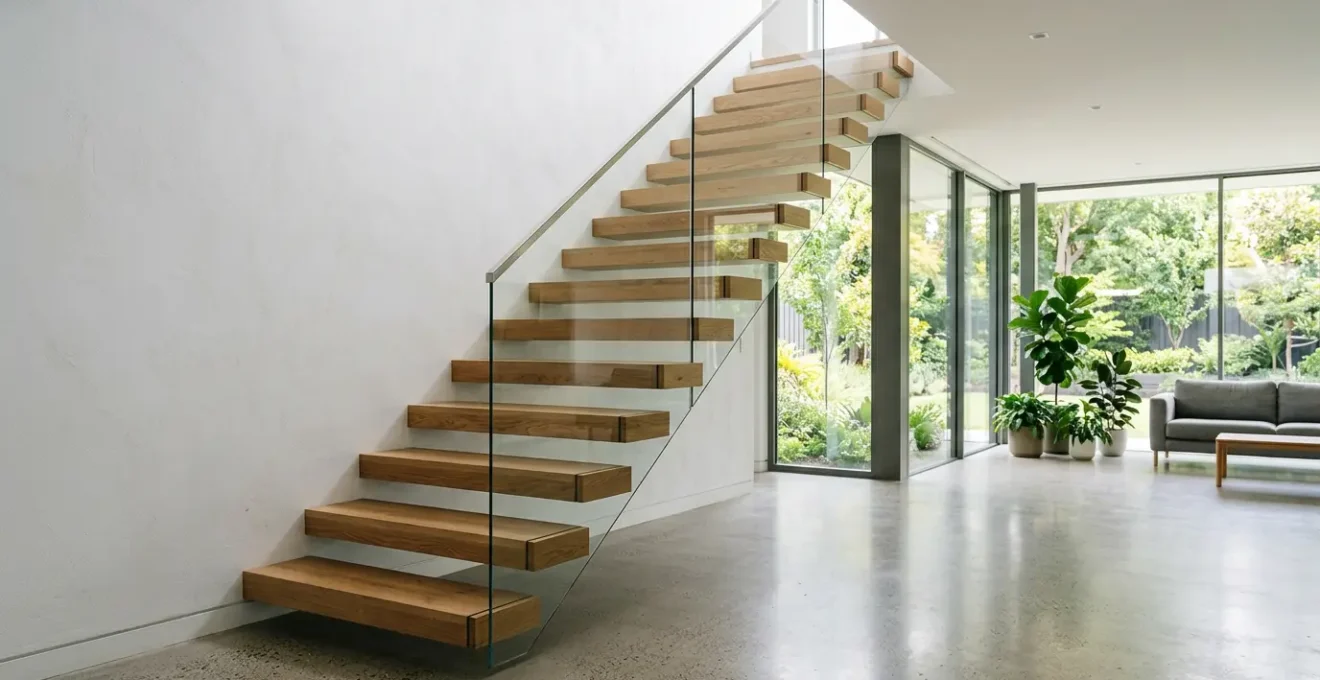
The allure of a floating staircase is its defiance of gravity. Each tread hangs in space, creating an architectural feature that feels light, open, and modern. For home builders and designers, this aesthetic is the ultimate expression of minimalism. But for every stunning image on a mood board, there’s a nagging fear: the building inspector’s red tag. The very openness that makes these stairs desirable can also make them a minefield of safety code violations, from tread gaps to structural stability.
Most guides cover the basics: you need a handrail, the space between steps must be limited. They touch on the “what” of safety compliance. However, they rarely venture into the “how”—the sophisticated engineering that allows architects to create breathtakingly minimalist designs that are not just compliant, but fundamentally safe. The most successful floating stairs don’t have safety features tacked on as an afterthought; their safety is embedded in their very structure, in the choice of materials, and in the science of their construction.
This is an architect’s perspective on that hidden engineering. It’s about moving beyond simply meeting codes to understanding the principles that allow for innovation within them. We’ll deconstruct the essential structural supports, analyze the material science that makes treads secure, and explore how integrated systems for lighting and acoustics elevate a simple staircase into a masterfully engineered component of the home. The goal is to prove that world-class design and uncompromising safety are not mutually exclusive; they are two sides of the same coin.
This in-depth guide explores the critical engineering and design considerations for creating floating stairs that are as safe as they are beautiful. You’ll find a structured look at every aspect, from structural requirements to aesthetic integration.
Summary: How to Engineer Floating Stairs That Meet Safety Codes Without Losing Style?
- How to Baby-Proof Floating Stairs Without Ruining the Aesthetic?
- Glass vs Wood Treads: Which Is Safer for Sock-Wearing Families?
- How to Install LED Tread Lighting Hidden Within the Stringer?
- The Hidden Steel: What Wall Support Is Needed for Cantilevered Stairs?
- Why Do Floating Stairs Echo and How to Dampen the Footfall Noise?
- Why Do Standard Drywall Studs Fail With Museum-Grade Art?
- The Noise Risk: Ensuring Your Kinetic Art Doesn’t Drive You Crazy
- How to Optimize Home Interiors for Open Flow in Small Spaces?
How to Baby-Proof Floating Stairs Without Ruining the Aesthetic?
The primary concern for families is the open riser, the very feature that defines a floating stair. The fear of a child slipping through the gaps is valid, and it’s directly addressed by building codes. Most regulations are based on the “4-inch sphere rule,” which states that no gap in a staircase—be it between risers or balusters—should be large enough for a 4-inch sphere to pass through, approximating the size of a small child’s head. Building codes require that the gap between treads must not exceed this critical dimension.
However, compliance doesn’t have to mean sacrificing the design’s lightness. The architect’s challenge is to close this gap in a way that feels intentional and visually unobtrusive. This is where creative, integrated solutions come into play, turning a safety requirement into an aesthetic enhancement. Rather than bulky, aftermarket gates, the focus is on custom-fabricated elements that match the staircase’s material palette and design language.
Effective childproofing strategies are designed into the staircase from the beginning. These can include:
- Clear Infill Panels: Installing clear acrylic or tempered glass barriers between the treads. This solution completely closes the gap while remaining virtually invisible, preserving the open and floating look.
- Integrated Safety Gates: Designing custom-fabricated gates at the top and bottom of the stairs. By using the same materials, such as steel rods or glass panels, these gates pivot or slide seamlessly, appearing as a natural part of the structure.
- Handrail as a Barrier: Using the handrail design itself as the primary childproofing element. This can be achieved with vertical balusters spaced closely together or, for a more monolithic look, solid glass panels that extend from the handrail down to the treads.
- Traction and Visibility: Applying high-friction, transparent anti-slip coatings to treads or using carpet runners with secure anti-slip backing to provide better grip for small feet.
Glass vs Wood Treads: Which Is Safer for Sock-Wearing Families?
The choice of tread material goes far beyond aesthetics; it’s a critical engineering decision that directly impacts safety, especially in a household where people wear socks. While wood feels traditional and warm, glass offers a unique sense of lightness. But is it safe? The answer lies in modern material science and a metric known as the Coefficient of Friction (COF). This value measures the slip resistance of a surface. For true safety, the ADA recommends a COF of 0.60 or above for accessible walkways.
Contrary to popular belief, structural glass treads are not inherently slippery. High-end manufacturers use acid-etching, sandblasting, or ceramic frits to create a textured, high-friction surface that provides excellent grip without sacrificing transparency. This treatment is key to making glass a viable and safe option. Wood’s COF, on the other hand, can vary dramatically depending on its finish; a high-gloss varnish can be far more hazardous than a textured glass surface.
However, safety isn’t just a physical measurement. There’s also the element of psychological safety. The transparency of glass can induce vertigo or a feeling of unease in some individuals, whereas the solid, opaque nature of wood provides a greater sense of confidence and stability underfoot. The following table breaks down the key performance differences, based on data from industry analysis like that found in technical documents from glass industry authorities.
| Factor | Glass Treads | Wood Treads |
|---|---|---|
| Slip Resistance (COF) | 0.50+ (acid-etched/sandblasted) | Varies 0.40-0.70 (finish dependent) |
| Acoustic Performance | Reflects sound, feels cold | Naturally dampens footfall noise, feels warm |
| Psychological Safety | Transparency can induce vertigo | Solid appearance increases confidence |
| Maintenance & Wear | Scratches highly visible over time | Graceful aging with patina |
| Treatment Options | Ceramic frits, frosted interlayers, anti-slip coatings | Textured finishes, grooves, non-slip strips |
How to Install LED Tread Lighting Hidden Within the Stringer?
Integrated lighting is a hallmark of high-end staircase design, enhancing both safety and ambiance. The most elegant solution is to conceal the light source entirely, creating a glow that appears to emanate from the structure itself. The key to this “seamless integration” is planning the electrical pathways during the fabrication of the steel stringer—the main support beam of the staircase.
This approach requires a level of foresight that goes beyond standard construction. Instead of running external conduit or cutting into drywall later, the stringer is designed as a functional chassis for the lighting system. This is a prime example of form and function merging perfectly.
Case Study: Integrated LED System in a Steel Stringer
A residential floating staircase project featured a hollow steel stringer specifically engineered for LED wiring and driver integration. The 10mm steel profiles were laser-cut with dedicated conduit pathways before fabrication. This allowed for the complete concealment of all electrical components while maintaining the stringer’s structural integrity. To ensure longevity, removable access panels, flush with the stringer’s surface, were designed at strategic intervals, enabling future maintenance without any aesthetic compromise.
Successfully executing this requires a detailed strategy that bridges architectural design, electrical planning, and metal fabrication. It transforms the stringer from a simple support into a multi-functional piece of infrastructure.
Action Plan: Integrating Concealed LED Lighting
- Structural Integration: During the design phase, specify that the steel stringer be fabricated with integrated hollow channels. These channels must be sized to accommodate wiring, low-profile LED drivers, and allow for heat dissipation.
- Lighting Specification: Specify high-CRI (Color Rendering Index 90+) LEDs to ensure materials and skin tones appear natural. Integrate smart controls like DALI or Casambi to allow for dimming, scheduling, and even circadian rhythm synchronization.
- Light Placement Strategy: Implement grazing light techniques. This can involve uplighting the adjacent wall from a channel in the stringer or backlighting the treads themselves to enhance the “floating” illusion and prevent glare.
- Maintenance Planning: Incorporate discreet, removable access panels or design modular lighting components from the outset. This ensures that LED strips or drivers can be replaced years later without requiring structural modification or demolition.
The Hidden Steel: What Wall Support Is Needed for Cantilevered Stairs?
A floating staircase is a cantilever system, where each tread acts as a lever extending from the wall. The minimalist aesthetic is only possible because of a robust, hidden structural system that bears the load. Standard wood or metal studs inside a drywall partition are completely inadequate for this task; they are designed to handle vertical (compressive) loads, not the significant bending and twisting (torsional) forces exerted by a cantilevered tread.
The necessary support is almost always a substantial steel structure concealed within the wall cavity. This can be a heavy-duty steel stringer, a series of steel plates, or a custom-fabricated frame. In new construction, this frame is integrated into the building’s main structure during the framing stage. For masonry walls, structural engineers often recommend a minimum thickness of 11 inches for reinforced concrete to provide sufficient anchoring mass. The engineering is not trivial, as noted by industry experts.
The engineering calculations for these structures are complex, requiring careful analysis of bending moments, shear forces, and deflection limits.
– ErectaStep Engineering Team, Cantilevered Stairs Technical Guide
Retrofitting floating stairs into an existing home is a far more invasive and expensive process. It typically involves removing the entire wall surface to expose the studs, then installing a dedicated steel support system that is bolted to the floor joists and ceiling joists. This demonstrates that the “floating” illusion is supported by a very solid, very real, and very well-engineered reality hidden from view. The foundation beneath the supporting wall may even need reinforcement to handle the concentrated loads.
Why Do Floating Stairs Echo and How to Dampen the Footfall Noise?
One of the most overlooked aspects of floating stair design is acoustics. Their open structure and hard materials (steel, wood, glass) can create an unintended drum effect, amplifying the sound of every footstep and causing it to echo throughout an open-plan home. This happens for two main reasons: vibration transfer and sound reflection. The rigid connection between the treads, the steel stringer, and the wall structure provides a direct path for impact vibrations to travel through the building. Furthermore, the hard surfaces of the stairs and surrounding minimalist interior reflect sound waves, creating resonance.
The solution lies in a principle borrowed from audio engineering: acoustic decoupling. This involves creating breaks in the structural path to stop vibrations from propagating. By inserting a layer of dampening material at key connection points, the vibration energy is absorbed and converted into a negligible amount of heat. This small detail, invisible to the eye, makes a massive difference in the auditory experience of the home.
The material of the tread itself also plays a huge role. Acoustic testing reveals that solid oak treads have a natural ability to dampen sound due to their internal fiber structure, while steel or glass treads tend to reflect and amplify it. To combat this, a multi-pronged approach to sound dampening is most effective:
- Structural Isolation: Install high-density neoprene or specialized rubber isolation pads between the steel stringer and the wall frame to decouple the staircase from the building structure.
- Tread Isolation: Place a thin layer of isolation material between the treads and their steel supports to prevent direct vibration transfer at the point of impact.
- Surface Absorption: Add an acoustic underlayment beneath any carpet or a runner on the stairs to absorb impact noise at its source.
- Wall and Cavity Damping: Incorporate mass-loaded vinyl (MLV) or acoustic foam into the surrounding wall cavities to absorb any residual structure-borne vibration and reflected sound energy.
- Room Acoustics: Install discreet acoustic panels on adjacent walls or ceilings to reduce echo and reverberation in the open-plan space.
Why Do Standard Drywall Studs Fail With Museum-Grade Art?
The engineering principles that govern floating stairs have direct parallels in other areas of high-end home construction, such as mounting heavy, museum-grade artwork. A large, heavy piece of art places the exact same type of cantilevered load on a wall as a single stair tread. As one structural analysis points out, the physics are identical, even if the application is different.
A heavy piece of art creates the same cantilevered load on a wall stud as a floating stair tread, but with different failure points.
– Structural Engineering Analysis, Cantilever Staircases: How They Work, Structural Limits, and Risks
A standard 2×4 wood stud within a drywall partition is simply not designed to resist this kind of pulling and bending force. Relying on a simple stud finder and a heavy-duty screw is a recipe for disaster, risking damage to both the artwork and the wall. The anchor point can pull out, or the stud itself can twist and fail over time. Just as with floating stairs, the solution requires thinking about the hidden structure within the wall and reinforcing it *before* the final finishes are applied.
For builders and renovators planning for significant art installations, professional-grade reinforcement is essential. These methods create a solid, continuous anchor plane that distributes the load across a much wider section of the wall structure, ensuring a secure and permanent installation.
- Solid Blocking: Install horizontal wood beams (blocking) between the vertical studs at the planned mounting height of the artwork. This is best done during the initial construction phase.
- Plywood Sheathing: Apply a full sheet of 3/4-inch plywood to the studs behind the drywall. This creates a continuous, solid surface to anchor into at any point.
- Embedded Steel: For extremely heavy installations (over 100 pounds), embed structural steel frames or plates within the wall cavity, tying them directly into the floor and ceiling joists.
- Doubled-Up Studs: Reinforce specific mounting locations by doubling or tripling up the vertical studs to handle concentrated loads.
- Masonry Anchoring: When mounting on concrete or brick walls, use specialized chemical or expansion anchors that bond with the substrate for maximum pull-out resistance.
The Noise Risk: Ensuring Your Kinetic Art Doesn’t Drive You Crazy
The principles of acoustic engineering extend beyond footfalls. In a modern home filled with hard surfaces and open spaces, even subtle sounds can become major annoyances. This is especially true for kinetic art, where motors and moving parts can introduce low-frequency vibrations into the home’s structure. These vibrations can travel through walls, floors, and, most notably, resonant structural elements like floating stair stringers.
The danger is a phenomenon known as harmonic resonance. If the frequency of the vibration from an artwork’s motor aligns with the natural resonant frequency of a structural element, it can cause that element to vibrate sympathetically, dramatically amplifying the sound. An otherwise silent sculpture can make a steel stringer hum or a large wall buzz, creating an maddening, pervasive noise.
Case Study: Harmonic Resonance in an Open-Plan Home
Acoustic analysis in a modern residence with a floating staircase revealed that a new motorized sculpture was creating an unexpected and irritating hum throughout the house. The low-frequency vibrations from the art’s motor were transferring through the wall and causing the long, open steel stair stringer to resonate. The solution was to decouple the artwork from its mounting points using specialized Sorbothane isolation mounts, which stopped the vibrations at their source before they could transfer to the building’s structure.
Preventing this requires the same “acoustic decoupling” strategy used to silence staircases. By isolating the art from the wall, you break the path of vibration. This is a technique borrowed directly from high-end audio engineering, where isolating turntables and speakers is critical for clean sound.
- Use rubber or spring-based isolation mounts (like Sorbothane) between the artwork’s bracket and the wall.
- Specify near-silent DC brushless or stepper motors instead of standard AC motors in commissioned pieces.
- Apply mass-loaded vinyl (MLV) to the wall cavity behind the artwork to add acoustic mass and dampen any transmitted vibrations.
- Strategically position kinetic art away from highly resonant structures like long steel beams or stair stringers.
- Treat the room’s acoustics with absorbent materials like rugs, curtains, or dedicated acoustic panels to reduce sound reflection.
Key Takeaways
- Structural loads are managed by a hidden steel superstructure, not the visible wall surface. This internal frame is the most critical safety component.
- True safety is a function of material science (like a tread’s Coefficient of Friction) and acoustic decoupling, not just visible, add-on features.
- The feeling of “open flow” is an engineered outcome, achieved through deliberate light path management and strategic spatial planning, not just the absence of walls.
How to Optimize Home Interiors for Open Flow in Small Spaces?
In compact living spaces, every architectural element must perform multiple duties. A floating staircase excels in this environment, acting not as a barrier but as a “permeable zone divider.” Its transparent design maintains visual connection and allows light to pass through, making a small space feel significantly larger and more cohesive. This is the essence of light path engineering: the deliberate design of structures to channel and maximize the flow of natural light.
Instead of a solid mass that blocks light and divides a room, a floating staircase with glass or thin-profile treads allows light from a window on one side of the room to reach the other. It can be strategically angled to frame a view or create a diagonal vista from the entryway to a distant window, a classic architectural trick to expand the perception of space.
Case Study: The Staircase as a Spatial Divider
In a 900-square-foot urban loft, a mono-stringer floating staircase was used to define the boundary between the living and dining areas without a wall. Its transparent design maintained a visual connection across the entire floor. Occupant perception studies indicated that this strategic placement, which created diagonal sightlines to a floor-to-ceiling window, made the compact space feel up to 40% larger. The use of glass treads maximized the transmission of natural light, with the staircase reflecting daylight throughout the day as the sun’s angle changed.
To achieve this effect, every component of the staircase must be considered for its impact on light and space. The goal is to reduce visual mass and enhance transparency wherever possible. This is a design philosophy that can be applied with a clear set of principles.
- Map Light Sources: Before placing the staircase, map the natural light sources (windows, skylights) and position the stairs to minimize obstruction during peak daylight hours.
- Specify Thin-Profile Treads: Select glass or thin-profile treads (with a maximum thickness of 50mm or 2 inches) to allow vertical light to pass between floors.
- Minimize the Stringer: Specify mono-stringer (a single beam underneath) or no-stringer (treads anchored directly to the wall) designs to eliminate visual mass and maximize open sightlines.
- Create Diagonal Vistas: Angle the staircase to frame an architectural view or a window, drawing the eye across the space and making it feel larger.
- Utilize Negative Space: Integrate low-profile, floating furniture (like a console or bench) underneath the stairs to utilize the volume without compromising the open aesthetic.
To ensure your project successfully embodies both minimalist beauty and absolute structural integrity, the next logical step is to consult a qualified structural engineer or stair architect early in the design process. This proactive collaboration is the key to transforming an ambitious vision into a safe, compliant, and breathtaking reality.