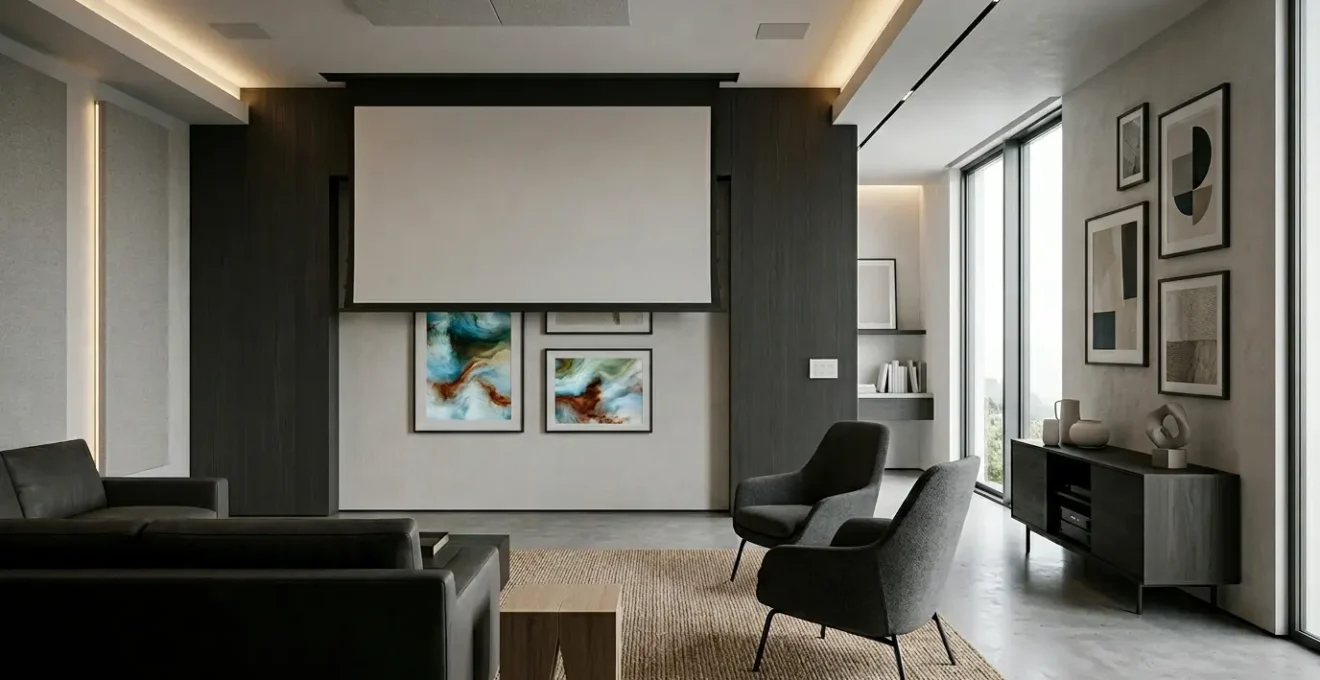
Designing a truly immersive media room isn’t about buying the latest standalone tech. The key is to create an integrated architectural system built for scenography—the art of instantly transforming the space’s atmosphere from a cinematic cocoon to a vibrant digital art gallery. This guide focuses on the foundational decisions in wiring, lighting, and acoustics that make this adaptability possible.
The concept of a media room is shifting. It’s no longer just a dark space for watching movies; it’s becoming a fluid, experiential canvas. For tech-forward homeowners, the dream is a room that transforms at the touch of a button—one moment, a pitch-black cinema with visceral sound, the next, a brightly lit gallery showcasing ephemeral digital art. The common advice often focuses on buying a big screen and good speakers, but this approach misses the fundamental challenge: creating a space that can flawlessly serve two very different masters.
Many homeowners invest heavily in high-end components, only to find their room is a one-trick pony, permanently optimized for a single function. The real art lies not in the components themselves, but in the underlying architecture that supports them. This requires thinking less like a consumer and more like a theatrical set designer, planning for the scenography of the space. But what if the true secret to a future-proof media room wasn’t about the technology you can see, but the invisible framework you build into the walls, ceiling, and floor?
This is where we move beyond a collection of gadgets and into the realm of an integrated sensory system. The solution is to design the room’s infrastructure for dual-modality from day one. It’s about creating a foundation that allows light, sound, and visuals to be programmed and repurposed, ensuring the space remains relevant and breathtaking as technology and art forms evolve. This article will guide you through the core architectural and technical decisions needed to build this adaptable entertainment space, focusing on the foundational elements that enable true transformation.
To fully grasp how to create this adaptable space, we will explore the critical decisions from the screen technology itself to the invisible infrastructure that makes it all work. This guide provides a strategic roadmap for designing a media room that is not just immersive, but truly alive.
Summary: How to Design a Media Room That Adapts to Immersive Digital Art?
- Short Throw Projector vs OLED Wall: Which Is Best for Digital Art?
- How to Pre-Wire Walls for Future Tech Without Opening Drywall Later?
- The “Cinema to Gallery” Switch: Programming Smart Lights for Dual Use
- How to Soundproof a Media Room So Bass Doesn’t Disturb Bedrooms?
- The Obsolescence Trap: Which Hardware Is Modular Enough to Upgrade?
- How to Configure Spotlights to Maximize Kinetic Shadow Throw?
- Why Does 4000K Lighting Make Modern Homes Feel Like Hospitals?
- Which Digital Canvas Technology Display NFT Art with Museum Quality?
Short Throw Projector vs OLED Wall: Which Is Best for Digital Art?
The visual centerpiece of your media room is the first and most critical decision. The debate between an Ultra Short Throw (UST) projector and a large OLED display is not merely about size or price; it’s a choice between two fundamentally different ways of rendering light and color, each with profound implications for digital art. As one analysis team notes, “For years, the division was simple: OLED was for picture quality, and projectors were for size. But technology moves fast.” For cinematic viewing, the sheer scale of a 120-inch or larger projector screen is undeniably enveloping. However, for displaying vibrant, generative, or NFT art, the equation changes.
OLED (Organic Light-Emitting Diode) technology offers an infinite contrast ratio because its individual pixels can turn off completely to produce perfect, absolute black. This makes colors pop with incredible vibrancy and provides unparalleled detail in dark scenes. A recent 48-hour comparison test of top UST projectors found that while they deliver immersive pictures, their black level remains a key weakness compared to an OLED reference display. This is inherent to the technology; projectors create black by blocking light, which inevitably results in a dark grey, not true black.
Conversely, the latest projector technologies are closing the gap. High-end laser projectors bring a different quality to the image—a more filmic texture that can feel less “digital” and more organic. While black levels are a challenge, contrast is improving dramatically, with some premium RGB laser projectors achieving a 6000:1 native contrast ratio. Ultimately, the choice depends on your priority. If your primary use is displaying art that relies on extreme contrast and saturated color against a pure black background, OLED is the superior canvas. If you prioritize cinematic scale and a slightly softer, more textural image, a high-quality UST laser projector is an excellent choice. Many purists opt for both: a large OLED for art and a drop-down projection screen for movies.
How to Pre-Wire Walls for Future Tech Without Opening Drywall Later?
A truly future-proof media room is built from the inside out. The technology you see today will be obsolete in a few years, but the “nervous system” inside your walls can be designed for decades of evolution. The single most important investment you can make is not in a specific cable, but in the pathway for future cables: conduit. As wiring experts state, using conduit “allows you to run different cables at a later point in time” without the destructive and costly process of opening up finished walls. This architectural foresight is the bedrock of an adaptable space.
The strategy involves a two-tiered approach. First, the macro-infrastructure: install wide-diameter (e.g., 2-inch PVC) conduits running from a central equipment hub (like a basement or closet) to the attic and to key locations like the media wall and ceiling projector mount. This “super-highway” is for the bulky, unknown cables of tomorrow. Second, the micro-infrastructure: within these conduits or alongside them, pre-pull the best-in-class cables of today. This means running both multi-strand fiber optic cable (like Multimode OM3) and a high-bandwidth copper cable like Cat7 or Cat8. Fiber is immune to electromagnetic interference and provides a virtually unlimited data ceiling for future video formats, while Cat cables provide power (PoE) and connectivity for a vast ecosystem of current devices.
Beyond simple video and data, think about the room as a sensory canvas. This means planning for future interactive elements. Install discreet, powered junction boxes in the ceiling and upper corners of the room. These can later house presence sensors, LiDAR scanners for interactive projections, or depth cameras without requiring new wiring. By embedding this robust and accessible infrastructure during construction or renovation, you are not just pre-wiring for a new TV; you are building a platform ready for any technological shift, ensuring your media room can evolve gracefully for years to come.
The “Cinema to Gallery” Switch: Programming Smart Lights for Dual Use
The magic of an adaptive media room lies in its ability to transform its atmosphere instantly. This “Cinema to Gallery” switch is almost entirely orchestrated by light. It’s not about simply dimming the lights; it’s about a sophisticated, pre-programmed scenography that controls multiple layers of lighting to sculpt the room’s mood. A cinematic setting demands the near-total absence of light, with only subtle, low-level accents for safety. A gallery setting, conversely, requires high-quality, high-CRI (Color Rendering Index) light that makes digital art appear vibrant and accurate.
Achieving this dual-modality requires a multi-layered lighting plan. This typically includes:
- Cove Lighting: RGBW (Red, Green, Blue, White) LED strips hidden in ceiling coves can wash the ceiling with a specific color temperature—a warm, soft glow for ambiance or a neutral white to complement gallery mode.
- Wall Grazers: Downlights positioned close to a textured wall can create dramatic shadows or provide an even wash of light. In cinema mode, they are off. In gallery mode, they provide the primary ambient light.
- Accent Spotlights: The most critical element for art. These are narrow-beam, high-CRI adjustable fixtures (often on a track) precisely aimed to illuminate the digital canvas or physical objects in the room. They must be on a separate, controllable circuit.
- Step/Floor Lighting: Very low-lumen fixtures for safety during cinematic viewing, which become part of the overall ambient light in gallery mode.
The key is a powerful smart lighting control system (like Lutron, Control4, or Crestron) that can program these layers into “scenes.” A “Cinema” scene would turn spotlights and grazers off, dim cove lights to 5% in a warm color, and activate step lights. A “Gallery” scene would bring the spotlights up to 100% at a neutral 4000K, set the wall grazers to 50%, and adjust the cove lighting to balance the room. This level of control transforms lighting from a utility into a primary design tool, giving the room its soul and its transformative power.
How to Soundproof a Media Room So Bass Doesn’t Disturb Bedrooms?
An immersive audio experience is visceral, felt as much as it is heard. The deep, low-frequency effects (LFE) from a powerful subwoofer are what make movie explosions and musical basslines physically impactful. However, this same low-frequency energy is a structural menace, traveling through wood framing, floors, and ductwork to vibrate throughout the entire house. Standard soundproofing methods, like adding thick carpet or acoustic panels, are effective for mid and high frequencies (like voices) but do almost nothing to stop bass. The reason is a matter of physics; as industry experts note that standard STC ratings only measure down to 125Hz, while the impactful bass in films and music often exists in the 40-80Hz range.
To properly contain bass, you must move from sound absorption to structural decoupling. As acoustic specialists explain, decoupling is a soundproofing method that involves “separating structural elements… so that sound vibrations cannot easily travel through them.” The most effective way to achieve this is by building a “room-within-a-room.” This is an architectural approach where the inner walls, ceiling, and potentially the floor of the media room do not directly touch the main structure of the house. Sound energy hits the inner wall, but the physical air gap and specialized connectors prevent that vibration from passing to the outer structure.
This involves a combination of techniques: adding mass to the walls (typically with double layers of drywall), using a damping compound like Green Glue between drywall layers to convert sound energy into heat, and using specialized hardware like resilient sound clips and channels to create the decoupled frame. Sealing all air gaps around doors, outlets, and HVAC vents is also critical, as sound will exploit any weakness. This level of sound isolation is a serious construction project, not a decorative fix, but it’s the only way to achieve a truly isolated acoustic environment where a powerful cinematic experience doesn’t mean a vibrating bedroom upstairs.
Action Plan: Building a ‘Room-Within-a-Room’ for Bass Isolation
- Decoupling Framework: Build a double wall system or a single stud wall using resilient soundproofing clips and hat channels to create a break between the inner and outer structures.
- Mass Addition: Install a double layer of 5/8-inch drywall on the decoupled framework. The added weight is crucial for impeding low-frequency transmission.
- Damping Application: Apply a damping compound (e.g., Green Glue) between the drywall layers to convert sound vibrations into a negligible amount of heat.
- Absorption Strategy: Fill the wall cavities with fiberglass or mineral wool insulation. This absorbs sound within the cavity but does not stop transmission on its own.
- Seal Weak Points: Use solid-core doors with automatic bottom seals, install putty pads on all electrical outlets, and use HVAC duct liners or baffle boxes to prevent sound from escaping through ventilation.
The Obsolescence Trap: Which Hardware Is Modular Enough to Upgrade?
In a world of rapidly evolving technology, the fear of buying expensive equipment that becomes obsolete in a year is very real. Future-proofing is not about finding a magic component that will last forever; it’s about a strategic approach to building a modular system where the most rapidly evolving parts can be easily and inexpensively swapped out. The most effective strategy is the “Brain vs. Body” investment principle. This framework divides your AV system into two categories: long-term investments and disposable components.
The “Body” components are the parts of the system with slow-moving technology. This includes your speakers, amplifiers, acoustic treatments, and projection screen. These are the elements where you should invest in the highest quality you can afford. A great set of architectural speakers or a high-end power amplifier can perform exceptionally for 10, 15, or even 20 years. Their fundamental technology does not change quickly. These are the long-term bones of your system.
The “Brain” components are the digital processing elements that evolve at a blistering pace. This category includes your AV processor or receiver, streaming devices (like Apple TV), and video sources (like a Blu-ray player or gaming console). This is where you should spend strategically, knowing you will replace them every 3-5 years to keep up with new formats (like HDMI 2.2, 8K video, or new audio codecs). The key is to ensure the “brain” is not permanently integrated into the “body.” For instance, avoid “smart” projectors with built-in, non-upgradable operating systems, and opt for an external AV processor rather than an all-in-one receiver if your budget allows. As one AV guide puts it, “Scalability allows you to easily add new components or upgrade existing ones as technology advances, without the need to replace your entire system.” By prioritizing open standards and modularity, you can create a system that evolves without requiring a complete overhaul.
How to Configure Spotlights to Maximize Kinetic Shadow Throw?
In a truly visionary media room, light does more than just illuminate; it becomes an artistic medium in itself. When incorporating kinetic sculptures or moving art pieces, you can use precisely aimed spotlights to “throw” dynamic, evolving shadows onto the walls, transforming a static surface into a living canvas. This technique, known as kinetic shadow play, elevates the room from a passive viewing space to an active, immersive environment. The goal is to treat shadow not as an absence of light, but as a deliberate and sculpted visual element.
The configuration depends on the effect you wish to achieve. To create long, dramatic, and distorted shadows, you need to use a hard-edged, narrow-beam spotlight placed at a low grazing angle relative to the art piece. The lower the angle of the light source, the longer and more stretched the resulting shadow will be. Positioning the light source far from the object will create sharper, more defined shadows, while moving it closer will soften the edges.
The real magic begins when you introduce multiple light sources. By using two or three spotlights from different angles, you can create layered, overlapping shadows that move independently as the kinetic sculpture shifts. Introducing color through RGB-capable spotlights adds another dimension entirely, allowing for the projection of cyan, magenta, and yellow shadows that mix and blend on the wall. The key is precision and control. Each spotlight must be individually aimable and dimmable through your smart lighting system. This allows you to program scenes that can switch from a single, dramatic white shadow to a complex, multi-colored dance, turning the walls of your room into an ephemeral, ever-changing work of art.
Why Does 4000K Lighting Make Modern Homes Feel Like Hospitals?
Lighting color temperature, measured in Kelvin (K), has a profound and often subconscious effect on how we perceive a space. While it may seem like a minor technical detail, choosing the wrong color temperature can ruin the entire ambiance of a home, making it feel sterile, cold, and unwelcoming. Many modern homes, aiming for a “crisp” or “clean” look, default to 4000K or even 5000K lighting. This is the color temperature of office fluorescent lights and clinical environments, and there’s a good reason for it: this cool, blue-white light promotes alertness and focus. However, in a residential setting meant for relaxation and comfort, it can feel jarring and institutional.
The reason lies in our evolutionary biology. For millennia, humanity has associated warm, yellow-orange light (around 1800K-3000K) with the setting sun and the glow of a fire. This type of light signals our brains that it’s time to wind down, relax, and prepare for sleep. It triggers a feeling of safety, comfort, and intimacy. Conversely, cool, blue-toned light (4000K and above) mimics the bright light of midday sun, which signals alertness and activity. When you flood a living room or media room with 4000K light in the evening, you are sending a conflicting message to your brain, creating a subtle sense of unease and preventing true relaxation. It can make natural materials like wood and textiles look washed out and lifeless.
For a residential media room, the ideal approach is to use “warm dim” or “tunable white” technology. This allows the color temperature of the lights to change as they dim. At 100% brightness (for cleaning or a high-energy gallery mode), the light might be a neutral 3500K. As you dim down for a relaxed ambiance or cinema mode, the color temperature automatically warms, dropping to a cozy 2200K or even 1800K at its lowest setting. This mimics the natural progression of daylight and creates a space that feels both sophisticated and deeply, intuitively comfortable. A 4000K setting can be a useful tool for a “task” or “gallery” scene, but it should never be the default ambient light for a space designed for comfort.
Key Takeaways
- Design for Scenography: Think of the room as a stage. The goal is an integrated system that can transform its atmosphere, not just a collection of high-end components.
- Infrastructure First: The most crucial future-proofing investment is in the “unseen” architecture: wide conduits for unknown future cables and a robust combination of fiber and Cat7/8 wiring.
- Isolate with Structure, Not Decor: To contain powerful bass, you must use architectural decoupling (a “room-within-a-room”) rather than relying on surface treatments like carpets or panels.
- Plan for Obsolescence: Use the “Brain vs. Body” principle. Invest heavily in long-lasting “body” components (speakers, amps) and plan to regularly upgrade disposable “brain” components (processors, streamers).
Which Digital Canvas Technology Display NFT Art with Museum Quality?
As digital art, including NFTs, moves from the screen to the wall, the demand for “digital canvases” that can display these works with museum-grade fidelity is exploding. Simply hanging a consumer television on the wall falls short. A museum-quality display is defined by its ability to reproduce the artist’s original intent with perfect accuracy, not by its ability to look bright and flashy in a big-box store. As the Home Technology Association (HTA) notes, “Home technology installation professionals are in a great position to specify the most appropriate ‘digital canvas’ as they are well-versed in the different display technologies available.” Achieving this quality requires looking beyond resolution and focusing on a trinity of professional metrics.
The first is color gamut coverage. A professional digital canvas must be able to reproduce a wide range of colors accurately. This means demanding a display that covers over 99% of the DCI-P3 color space, which is the standard for digital cinema, not just the smaller sRGB space used by most web content. The second is anti-reflection surface technology. A glossy screen that reflects windows and lights completely shatters the illusion of art. High-end digital canvases use sophisticated matte coatings or etched glass to diffuse ambient light, maintaining image clarity and color saturation even in a brightly lit room, mimicking the surface of a traditional painting or photograph.
The third, and perhaps most critical, metric is support for hardware-level calibration using 3D LUTs (Look-Up Tables). This allows a professional calibrator to fine-tune the display’s color, gamma, and grayscale performance with incredible precision. This ensures the display is not just “close” to accurate but is verifiably perfect, and that this calibration can be maintained over time. For OLED-based canvases, robust burn-in mitigation technology, like pixel-shifting algorithms and low-power modes that can display static art safely, is also a non-negotiable feature. Together, these technologies separate a mere screen from a true digital canvas worthy of displaying serious art.
By focusing on this integrated, architectural approach, you can create a media room that is not only a spectacular space for entertainment today but a fluid, adaptable platform ready to embrace the future of digital art and immersive experiences. The ultimate luxury is a space that can transform itself to match your mood and the art you wish to experience.