Softening an industrial loft for family isn’t about covering up its raw edges; it’s about making them work for you.
- Hard materials like steel don’t just contrast with velvet and wool; they actively amplify their perceived softness through a ‘material dialogue’.
- Acoustic and thermal problems are best solved with specific layering and decoupling techniques, not just surface-level fixes like rugs.
Recommendation: Embrace the ‘material dialogue’ by letting raw and refined elements enhance each other, creating a space that is both authentic to its industrial roots and deeply livable for your family.
The dream of a warehouse loft is intoxicating: soaring ceilings, vast open spaces, and an authentic, historical character written in exposed brick and raw steel. For many families, however, the reality can feel less like a design magazine and more like a beautiful, but cold, cave. The same concrete that looks so chic can amplify a toddler’s tantrum to concert levels, and the steel beams that lend so much character can feel unforgivingly hard in a home filled with play and life.
The standard advice is often to simply “add soft things”—piles of pillows, plush rugs, and cozy throws. While these elements are important, they often act as mere bandages, failing to address the fundamental tension between the industrial shell and the needs of a family. The real challenge isn’t to hide the industrial nature of the space, but to engage with it. The key is to move beyond simple decoration and into a deeper understanding of sensory design.
What if the secret wasn’t just covering up the hard surfaces, but mastering the art of material dialogue? This approach recognizes that the texture of raw steel can actually make velvet feel more luxurious, and the visual coolness of concrete can make a pool of warm light feel more inviting. It’s about creating ‘psychological rooms’ without walls through smart sensory zoning—using light, sound, and texture to carve out spaces for quiet, for play, and for togetherness. This guide will walk you through the practical strategies to create this harmony, transforming your loft from a raw space into a true family home.
To help you navigate this transformation, this article is structured to address the most pressing challenges of family life in an industrial space. You will find practical, expert-backed solutions for everything from noise control to material safety, all designed to help you create a home that is both beautiful and nurturing.
Summary: A Family-Friendly Guide to Softening an Industrial Loft
- Why Do Concrete Ceilings Amplify Toddler Noise to Unbearable Levels?
- How to Seal Exposed Brick to Stop Dust Without Changing the Look?
- Raw Steel vs Powder Coat: Which Is Safer for Households With Kids?
- Rug Layering Techniques: How to Insulate Cold Concrete Floors?
- How to Use Lighting Zones to Define Rooms in a Warehouse Shell?
- Why Does Hard Steel Make Velvet Furniture Look Softer?
- How to Introduce Wood Tones into a Concrete Shell?
- How to Restore Exposed Beams Without Damaging Their Structural Integrity?
Why Do Concrete Ceilings Amplify Toddler Noise to Unbearable Levels?
The first sensory shock for many families in a loft is acoustic. That beautiful, high concrete ceiling is a perfect sound mirror. Unlike porous materials that absorb sound, concrete is incredibly dense and non-porous. The result? Sound waves have nowhere to go but back into the room. This is not just a feeling; it’s physics. Soundproofing research confirms that concrete reflects approximately 98% of the sound waves that hit it, turning every dropped toy and excited shriek into a sharp, echoing report.
This creates a harsh soundscape that can be stressful for both children and adults. To tame the acoustics, you must stop the sound from bouncing. While soft furnishings like rugs and heavy curtains help absorb some of this echo, a truly effective solution requires tackling the ceiling itself. The goal is to break the direct path of sound from the room to the concrete and back again.
Professional solutions focus on two principles: decoupling and absorption. The following case study shows how these principles are applied.
Acoustic Treatment for Concrete Ceilings
As demonstrated by soundproofing experts, the most effective method is to create a ‘floating’ ceiling. This involves using resilient clips and furring channels to decouple a new layer of drywall from the original concrete structure. This air gap is critical. It’s then filled with high-density mineral wool, a material exceptional at absorbing airborne sound like voices. This combination of isolation (the gap) and absorption (the wool) dramatically reduces both impact and airborne noise, creating a calmer, more serene living environment without altering the industrial aesthetic from below.
How to Seal Exposed Brick to Stop Dust Without Changing the Look?
Exposed brick walls are a hallmark of industrial lofts, offering texture, color, and a sense of history. However, for a family with small children crawling on the floor, that beautiful feature can become a constant source of fine, reddish dust and grit. This “brick dust” is the result of the soft, porous surface slowly breaking down over time. Many parents worry about indoor air quality and the endless cleaning cycle this creates.
The common fear is that sealing the brick will leave it with an artificial, glossy sheen, destroying the very character you love. The solution lies in choosing the right type of sealer: a penetrating, breathable, matte-finish sealer. Unlike topical sealers that form a film on the surface, these products soak into the brick and mortar itself, binding the loose particles from within. The “breathable” aspect is crucial; it allows any moisture within the wall to escape, preventing long-term damage like spalling or decay.
When selecting a product, safety is paramount. Look for modern formulations specifically designed for interior use. Many VOC-compliant interior brick sealers are available, ensuring you aren’t introducing harmful chemicals into your home’s air. The application process is straightforward but requires care to achieve an invisible result.
Action Plan: Sealing Brick for a Dust-Free Home
- Thorough Cleaning: Begin by cleaning the brick surface meticulously with a stiff brush and vacuum. Avoid acid washing, which can damage old mortar and the brick face. The wall must be completely dry before proceeding.
- Select the Right Product: Choose a high-quality, water-based penetrating silane/siloxane sealer designed for breathability and an invisible, no-sheen finish. Prioritize low or zero-VOC formulations for indoor air quality.
- Perform a Test Patch: Always apply the sealer to a small, inconspicuous area first (e.g., behind a sofa or in a low corner). Let it dry completely to ensure it doesn’t alter the color or create an unwanted ‘wet look’.
- Even Application: Apply the sealer using a low-pressure pump sprayer for the most even, non-streaky coverage. The goal is for the brick to absorb the product, not for it to sit on the surface. Work from the top down.
- Assess and Reapply if Needed: After drying, run your hand over the test patch. If dust transfer is eliminated, proceed with the full wall. One coat is often sufficient.
Raw Steel vs Powder Coat: Which Is Safer for Households With Kids?
Structural steel beams, metal staircases, and steel-framed furniture are core elements of the industrial aesthetic. But for parents, raw steel presents a trio of concerns: the potential for rust (and tetanus risk from cuts), sharp edges from fabrication, and extreme thermal conductivity (getting very hot or cold to the touch). A common, and often superior, alternative is powder-coated steel.
Unlike traditional liquid paint, powder coating is a dry finishing process where a powder is electrostatically applied and then cured under heat. This creates a hard, durable finish that is much more resistant to chipping, scratching, and fading than paint. For families, its advantages go beyond durability. The curing process creates a completely inert, non-toxic surface, making it safe for environments with children. It also encapsulates the steel, preventing rust and smoothing over minor fabrication imperfections. This comparison breaks down the key safety factors for a family home.
This decision is a clear example of balancing the raw ‘living finish’ of industrial materials with the practical safety needs of a family. The table below, based on an in-depth analysis of coating safety, outlines the trade-offs.
| Safety Factor | Powder Coating | Raw Steel |
|---|---|---|
| Chemical Toxicity (Cured) | Non-toxic, inert finish with minimal off-gassing; CPSIA compliant for children’s products (lead content below 90 ppm) | Requires maintenance oils/waxes that may not be child-safe unless food-grade (beeswax, carnauba) |
| Physical Damage Risk | Chip-resistant but creates sharp edges if damaged; surface is sealed and inert | Won’t chip but can rust; rust poses tetanus risk from cuts; requires regular maintenance |
| Thermal Properties | Provides slight thermal buffer; less extreme temperature sensation on touch | Conducts temperature extremes; can feel very hot or cold, potential discomfort or minor burn risk for sensitive skin |
| Maintenance & Longevity | Set-and-forget finish; uniform appearance until damaged; no ongoing chemical exposure | Living finish that patinates; requires maintenance ritual with oils; ongoing exposure to finishing products |
For most family applications on high-touch surfaces like railings, furniture legs, and low-level fixtures, powder coating offers a significantly higher margin of safety and practicality. It maintains the strong, clean lines of steel while removing the primary hazards associated with its raw form, making it a smart compromise for a family-friendly industrial aesthetic.
Rug Layering Techniques: How to Insulate Cold Concrete Floors?
Polished concrete floors are durable and stylish, but they are also a massive thermal sink, feeling uncomfortably cold underfoot, especially during cooler months. For a family with kids who spend a lot of time playing on the floor, this is a major comfort issue. A single rug often isn’t enough to combat the persistent chill. The solution is strategic layering, which creates insulating air pockets and combines materials for maximum warmth.
The effectiveness of this insulation is measured in R-value, the same rating used for wall insulation. The higher the R-value, the better it resists heat flow. While a standard rug has a minimal R-value, a high-quality rug pad can significantly boost performance. The thermal resistance of carpet padding typically ranges from R-0.2 to R-2.15, with dense felt or frothed foam urethane pads offering the best insulation. By combining a pad with multiple rug layers, you can create a surprisingly warm and comfortable surface.
The most effective strategy involves a three-part system that builds from a functional base to a plush, comfortable top layer:
- The Foundation (Insulation): Start with the highest-quality, thickest rug pad you can find (at least 1/2-inch dense felt or urethane). This is your primary thermal break against the cold concrete. It should be slightly smaller than your largest rug.
- The Base Rug (Structure): Over the pad, place a large, durable rug like a flatweave jute or sisal. This rug should be big enough to define the living area and anchor the furniture. Its job is to provide structure and texture while protecting the pad.
- The Zone Rug (Comfort): Finally, layer a smaller, plusher, high-pile rug on top. A wool or shag rug is perfect here. Place it in the area where comfort is most needed—under the coffee table where feet rest, or in the center of a play area. Wool is a superior natural insulator and will provide a soft, warm surface for direct contact.
This layered approach does more than just add warmth; it adds incredible visual depth and texture, reinforcing the soft, livable side of your loft’s character.
How to Use Lighting Zones to Define Rooms in a Warehouse Shell?
In a vast, open-plan loft, the absence of walls can be both a blessing and a curse. It creates a sense of space and light, but it can also make the environment feel cavernous and undefined, lacking the intimacy needed for family life. The most powerful and flexible tool for solving this is not furniture, but light. By creating distinct “lighting zones,” you can draw psychological boundaries and sculpt smaller, more intimate ‘rooms’ within the larger volume.
The strategy is to move away from uniform, overhead ambient light and toward a layered scheme of multiple light sources that can be controlled independently. Each zone should be defined by the quality and intensity of its light, tailored to the function of that space. This creates what designers call “pools of light,” which act as invisible walls, signaling a shift in purpose and mood.
Creating Livable Zones Through Light
Successful loft designs use strategic lighting to create psychological boundaries. For a seating or lounge area, designers specify low-hanging pendants or floor lamps with a warm color temperature (around 2700K) and put them on dimmers. This creates an intimate ‘cocoon’ of warm, low-level light that encourages relaxation and conversation. In contrast, the kitchen and work areas are defined by brighter, more focused task lighting (at a cooler 3000K-4000K). This clear differentiation in light quality effectively divides the open plan, telling your brain “this is a space for rest” and “this is a space for activity” without a single physical barrier.
Think of your lighting in three layers:
- Ambient: Overall, dimmable background light (like track lighting aimed at the ceiling).
- Task: Focused light for specific activities (under-cabinet lights, reading lamps).
- Accent: Dramatic light to highlight features (a spotlight on a brick wall or piece of art).
By controlling these layers, you can change the entire feel of your loft from a bright, open play space during the day to a series of cozy, intimate zones in the evening.
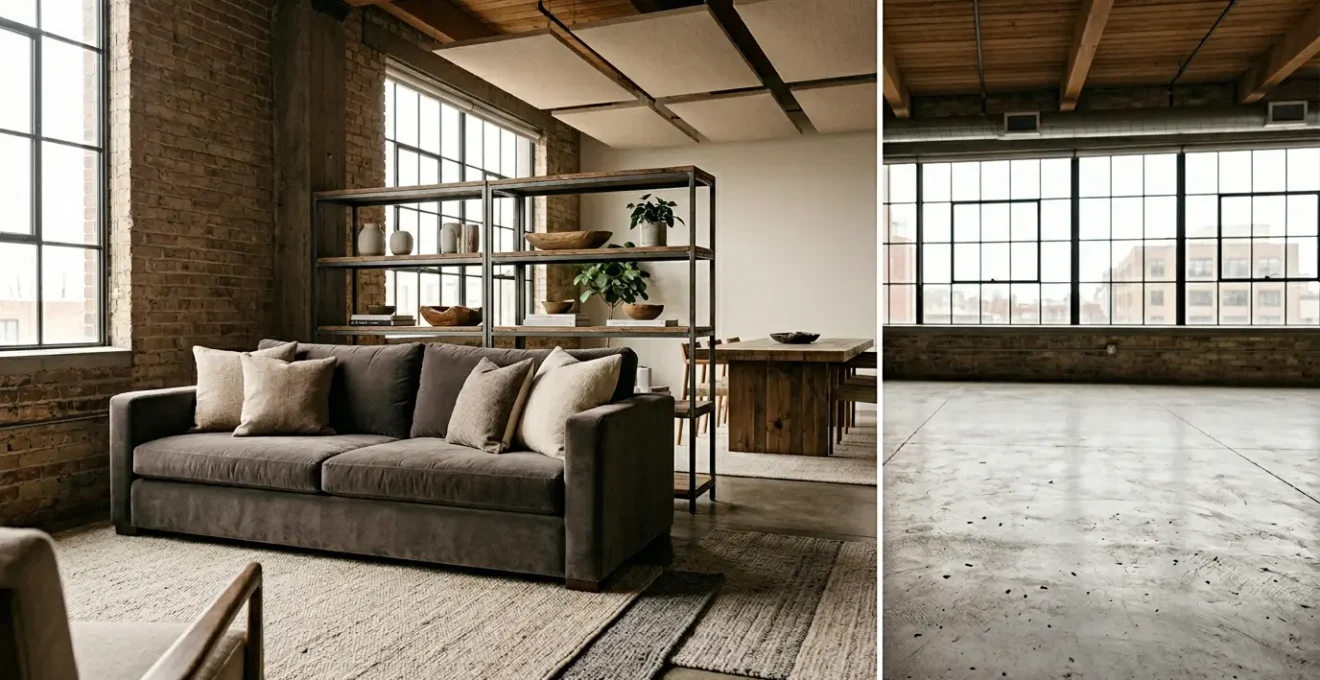
Why Does Hard Steel Make Velvet Furniture Look Softer?
This is the heart of the “Soft Industrial” aesthetic: the principle of material dialogue. Our perception of a material is not absolute; it’s highly influenced by what’s next to it. Placing a soft, light-absorbing material like velvet directly against a hard, reflective, and cool material like steel creates a powerful sensory juxtaposition. The steel, by its very nature, acts as a visual and tactile benchmark for ‘hard’. Against this benchmark, the velvet’s qualities—its deep pile, its soft texture, its lack of reflection—are dramatically amplified. It doesn’t just look soft; it looks exceptionally soft.
This is a conscious design choice that celebrates, rather than hides, the industrial skeleton of the building. Instead of trying to cover all the steel, you use it as a powerful backdrop. A velvet sofa with a delicate steel frame, a plush wool rug on a polished concrete floor, or a soft linen curtain against a raw brick wall—these pairings create a dynamic tension that is visually exciting and sophisticated.
As the editorial team at The Design Files aptly notes when discussing how to temper the industrial edge:
a little softening with furniture, art, lighting, window coverings and rugs is needed to make warehouses exceptional spaces to live in
– The Design Files editorial team
The key to this “softening” is not an overwhelming amount of fluff, but the strategic and thoughtful contrast of textures. This dialogue between hard and soft, raw and refined, is what creates a layered, interesting, and ultimately comfortable home.
By embracing this principle, you can have both the authentic character of your loft and the tactile comfort your family needs. You’re not erasing the industrial edge; you’re using it to make the soft moments even softer.
How to Introduce Wood Tones into a Concrete Shell?
After textiles, wood is the most powerful tool for bringing warmth and organic texture into a concrete and brick environment. It provides a necessary bridge between the hard, man-made industrial elements and the soft, comfortable furnishings. The question isn’t whether to use wood, but how to do so with intention, so it feels like an integrated part of the design rather than a random addition.
A helpful guideline is the classic 60-30-10 rule, adapted for an industrial material palette. This rule provides a simple framework for achieving a balanced and harmonious space. It prevents you from either erasing the industrial character or ending up with a space that feels too cold and monolithic.
Here’s how to apply it to a concrete loft:
- 60% Dominant Material: This is your loft’s existing character. Embrace the concrete, exposed brick, and structural steel as the primary palette that defines roughly 60% of the visual space. Don’t fight it.
- 30% Secondary Material (Wood): Introduce a single, consistent wood tone as your secondary, warming material. This should account for about 30% of your palette. This isn’t about small decor items; think bigger. This could be wide-plank wood flooring in one area, a large slat-wall room divider, or a significant piece of furniture like a large dining table or media unit.
- 10% Accent Material: The final 10% is for your accents. This is where you can bring in other metals (like brass or matte black fixtures), glass, and the vibrant colors from your textiles and artwork.
The choice of wood tone is also important. For a cohesive look, match the undertone of the wood to the undertone of your concrete. If your concrete is a cool blue-gray, pair it with ash, maple, or a whitewashed oak. If your concrete has warmer, beige undertones, it will look stunning with richer woods like walnut, teak, or acacia. This creates a sophisticated, tonal harmony rather than a jarring contrast.
Key Takeaways
- True loft living isn’t about hiding industrial features, but creating a ‘material dialogue’ where raw and refined elements enhance each other.
- Solve functional family problems first: use technical solutions for noise (decoupling), dust (sealing), and cold (layering) before focusing on aesthetics.
- Use light as a tool to create ‘psychological rooms’, carving out intimate, functional zones for family life within vast open spaces.
How to Restore Exposed Beams Without Damaging Their Structural Integrity?
The original timber beams in a warehouse conversion are more than just structural; they are artifacts of the building’s history. Restoring them can bring immense character to your home, but an aggressive approach can cause irreversible damage. It is absolutely critical to distinguish between restoration (preserving what exists) and renovation (changing its appearance entirely). For a family, ensuring these massive elements are structurally sound and clean is a top priority.
The number one mistake is sandblasting. While it quickly strips away old paint and grime, it is far too aggressive for old timber. It destroys the wood’s original surface patina and can gouge the softer wood grain, compromising both the aesthetic and potentially the surface integrity. Professional restorers use far gentler, non-destructive methods.
Non-Destructive Beam Preservation
As restoration experts emphasize, the primary goal is preservation. Instead of sandblasting, professionals may use CO2 dry-ice blasting, which freezes and fractures surface coatings without abrading the wood underneath. For less intensive cleaning, manual hand-scrubbing with pH-neutral wood cleaners is the preferred method. Most importantly, any cosmetic work must be preceded by a professional assessment from a structural engineer. They are trained to identify critical issues like dry rot, powderpost beetle infestations, or structural cracks that must be remediated before any aesthetic work begins. This “structure first” approach ensures the beams are not just beautiful, but safe for the family living beneath them.
Once the beams are certified as structurally sound and have been gently cleaned, finishing should be minimal. A simple coat of clear matte sealant can protect the wood from moisture and dust, or a natural wax finish can be hand-buffed to bring out a subtle, rich luster. The goal is to celebrate the wood’s history, including its imperfections, not to make it look brand new.
Start today by looking at one wall or one corner of your loft not as a problem to be covered, but as the start of a beautiful material dialogue. Assess the raw elements and consider how a single, thoughtful addition of texture or a focused pool of light could begin to transform the space into a home that is uniquely yours, and perfectly suited to your family.