Replacing art with a statement fixture is not about the object itself, but about using the light it casts as a sculptural medium.
- The fixture’s true value lies in its ability to shape perception through controlled luminance, shadow, and color temperature.
- Technical details like scale, CRI, and dimmer compatibility are the artist’s tools for transforming an empty space into an emotional landscape.
Recommendation: Shift your focus from “what fixture to buy” to “what effect of light do I want to create?” Treat your lighting as a dynamic installation, not static decoration.
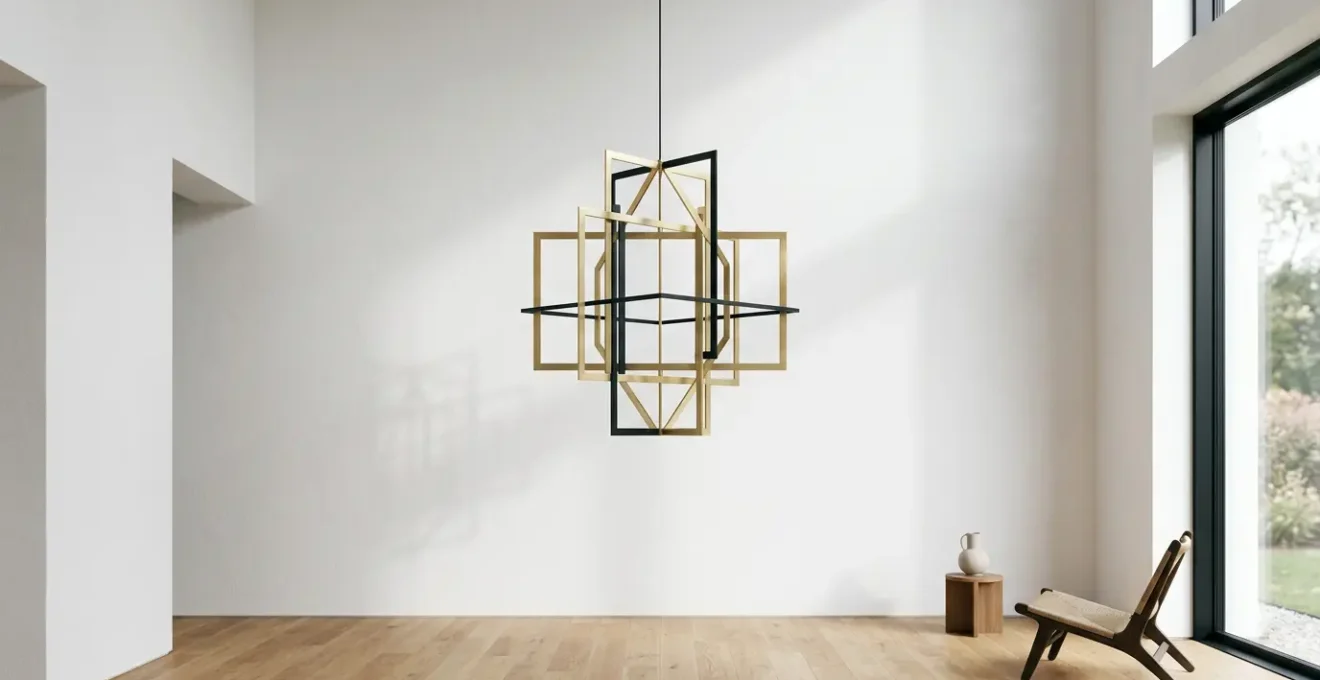
For the minimalist, the wall is a sanctuary. Every object placed upon it must justify its existence, a principle that often leads to a serene but potentially sterile environment. The conventional solution—a piece of art—can feel like a concession, a decorative layer that contradicts the ethos of “less is more.” This creates a dilemma: how does one introduce a powerful visual anchor and a point of profound interest into a space without resorting to traditional clutter?
Many will suggest a large chandelier or an interesting floor lamp, but this advice often misses the point. The common approach treats the fixture as a mere object, a piece of hardware to fill a void. This thinking leads to predictable results that lack soul. It’s an approach that focuses on the armature but forgets the sculpture. The true potential of statement lighting in a minimalist home isn’t in its physical form, but in its function as a tool for an entirely different kind of art: the art of sculpting with light itself.
The secret is to stop seeing the fixture as a replacement for a painting and start seeing it as the brush. The walls, floors, and sparse furniture become your canvas. The light it emits—its intensity, color, and direction—is your palette. This guide explores the principles of using a single luminary not as decoration, but as a primary focal point that carves out atmosphere, defines space, and creates a living, breathing installation that changes from day to night. We will delve into the technical grammar and artistic philosophy needed to make light the most compelling element in your home.
This article will guide you through the essential considerations for mastering this technique. We will cover the foundational rules of placement, the critical impact of bulb selection, and the transformative power of control, before exploring advanced concepts of scale, texture, and spatial anchoring.
Summary: How to Use Statement Lighting to Replace Art in Minimalist Homes?
- How Low Should a Chandelier Hang Over a Dining Table?
- The Bulb Mistake That Makes Expensive Fixtures Look Cheap
- Why Are Smart Dimmers Essential for Large Statement Fixtures?
- How to Clean a Crystal Chandelier Without Taking It Down?
- Oversized vs Undersized: Which Scale Error Ruins Room Proportions?
- How to Light a Statement Armchair for Dramatic Evening Impact?
- The Recessed Lighting Mistake That Casts Shadows on Sculptures
- How to Anchor a Room With One Statement Piece Without Overwhelming It?
How Low Should a Chandelier Hang Over a Dining Table?
Before light can become art, it must respect the fundamental grammar of space. The height of a chandelier over a dining table is the first and most critical rule in this language. Hanging it too high makes it feel disconnected and lost; too low, and it obstructs views and creates an uncomfortable glare. This is not just a decorative choice but a functional and compositional one. The fixture must relate to the table to create a unified Zone of Influence, a contained volume of light that defines the dining area as its own intimate setting within the larger room.
The objective is to create a relationship between the object and the surface it illuminates. The light should pool on the table, creating a focal point without interfering with conversation. A common guideline for a standard 8-foot ceiling is to position the bottom of the fixture between 30-36 inches above the table surface. This measurement ensures that the light source is below eye level for a standing person, preventing direct glare, yet high enough not to block sightlines across the table.
For ceilings taller than 8 feet, the rule evolves. A general practice is to add approximately 3 inches of hanging height for each additional foot of ceiling height. However, this is where artistic license begins. A very large or sculptural fixture might be hung slightly lower to emphasize its form, treating it more like a centerpiece suspended in space. Conversely, a wider, more delicate fixture might be hung slightly higher to allow its form to spread visually. The key is to test and feel the space. The rules provide a starting point; your eye provides the final edit.
The Bulb Mistake That Makes Expensive Fixtures Look Cheap
You’ve invested in a magnificent sculptural fixture. Its form is perfect, its material exquisite. Yet, when you turn it on, the magic vanishes. The room feels flat, colors appear distorted, and the expensive piece suddenly looks disappointingly ordinary. The culprit is almost always the bulb—a small detail with the power to completely undermine your artistic vision. Choosing a bulb based on brightness (lumens) or warmth (Kelvin) alone is a rookie mistake. The most crucial, and often overlooked, metric for artistic lighting is the Color Rendering Index (CRI).
CRI measures a light source’s ability to reveal the true colors of objects in comparison to a natural light source. It’s a scale from 0 to 100, with 100 being the quality of daylight. A low CRI bulb (typically below 80) will wash out colors, making rich woods look dull, vibrant textiles appear muddy, and skin tones look unnatural. It’s like viewing a masterpiece painting through a dirty filter. For spaces where a fixture is meant to be art, and to beautifully render the other textures in the room, lighting experts recommend bulbs with a 90+ CRI. This ensures that the light itself is of an artistic quality, honoring the true palette of your interior.
For interior designers, the 95 CRI is critical to ensure that their carefully chosen furniture and color schemes appear perfect.
– Waveform Lighting Technical Team, Does Color Rendering Matter? 80 CRI vs 90 CRI vs 95 CRI
This high-fidelity light is what separates decorative illumination from Sculptural Luminance. It ensures that the brass of your fixture glows with authentic warmth and that the grain of the wooden table beneath it is rendered with depth and richness. Paying a premium for a beautiful fixture only to handicap it with a low-CRI bulb is the aesthetic equivalent of buying a high-performance sports car and putting cheap tires on it. The full potential can never be realized.
Why Are Smart Dimmers Essential for Large Statement Fixtures?
A statement fixture that can only be on or off is not a sculpture; it’s a static object. To truly use light as an artistic medium, you need control over its intensity. A smart dimmer is the artist’s most essential tool, transforming a single light source into a dynamic installation capable of expressing a full range of moods. It’s the difference between a photograph and a film. Without it, your fixture is locked into a single expression, often one that is too harsh or overwhelming for many situations, especially in a minimalist space where every element is amplified.
The function of a dimmer goes far beyond simply making a room “moody.” It is a tool for compositional balance. During the day, you can dim the fixture to 10%, allowing its physical form to be the focal point without competing with natural light. In the evening, you can raise it to 70% for functional brightness over a dining table. Later, you can lower it to a 20% glow, transforming the fixture into a soft, ambient beacon and casting dramatic, elongated shadows that paint the walls. This ability to modulate Sculptural Luminance is what gives the piece life and allows it to adapt to the rhythm of the home. The growing trend of including them is clear, as nearly 60% of new residential projects incorporate smart dimmers, recognizing them as a modern necessity.
Smart dimmers elevate this control to another level. They allow you to program “scenes”—pre-set lighting levels for different activities like “Dinner,” “Relax,” or “Welcome.” This means your light sculpture can have its own choreography. Furthermore, many smart systems offer “dim-to-warm” technology, which mimics the behavior of an incandescent bulb by automatically warming the Chromatic Temperature (Kelvin) as the light is dimmed. This allows you to shift from a bright, neutral light to an intimate, candle-like amber glow, all from a single fixture. It is the ultimate tool for a light sculptor.
How to Clean a Crystal Chandelier Without Taking It Down?
A statement fixture, particularly one with crystal or complex glass elements, is a magnet for dust. A layer of grime can diffuse its light, dull its sparkle, and turn a magnificent sculpture into a sad, neglected object. Maintaining its brilliance is essential to preserving its artistic impact. The thought of disassembling a complex chandelier is daunting, but fortunately, it’s rarely necessary. With the right preparation and technique, you can restore its full radiance while it remains in place.
The key is a systematic approach that protects your fixture and the space below it. Before you begin, the most critical step is to turn off the power to the fixture at the circuit breaker. This is a non-negotiable safety measure. Next, prepare the area. Place thick towels or a blanket on the floor and over any furniture directly beneath the chandelier to catch drips and protect surfaces. If the fixture is over a dining table, cover it completely. This preparation prevents a simple cleaning task from turning into a major cleanup project.
There are two primary methods for in-place cleaning: a spray-drip method and a hand-polishing method. The spray method is best for intricate, multi-faceted crystal chandeliers where wiping each piece is impractical. You use a specialized chandelier cleaning solution, spray it generously over all the crystals, and let it drip dry. The formula is designed to dissolve dust and evaporate without leaving streaks. The hand-polishing method is better for larger, smoother glass or crystal pieces. It offers more control and delivers a superior shine. This hands-on approach truly connects you with the object, much like an artist maintaining their work.
Action Plan: Hand-Polishing Your Chandelier
- Prepare the Solution: Create a cleaning solution of one part isopropyl alcohol to three parts distilled water in a spray bottle. Distilled water is crucial to prevent mineral spots.
- Set Up a Dual-Cloth System: You’ll need two pairs of soft, lint-free microfiber cloths or white cotton gloves. One pair will be for cleaning (the damp set), and the other for drying and polishing (the dry set).
- Work in Sections: Mentally divide the chandelier into manageable sections (e.g., top tier, bottom tier, central column). Clean and dry one section completely before moving to the next to ensure you don’t miss any spots.
- Clean and Polish: Lightly spray the cleaning solution onto your “damp” cloth (never directly onto the fixture to avoid getting liquid in the electrical components). Gently wipe each crystal or glass piece. Immediately follow up with the “dry” cloth to polish it to a streak-free shine.
- Final Inspection: Once all sections are complete, stand back and view the chandelier from different angles to spot any missed areas or streaks. Wait at least an hour before restoring power to ensure all moisture has evaporated.
Oversized vs Undersized: Which Scale Error Ruins Room Proportions?
In the art of using lighting as a focal point, scale is everything. It is the single most powerful tool for creating drama and harmony, and also the easiest to get wrong. While an undersized fixture can look timid and lost, rendering it irrelevant, it is the oversized fixture that holds the greatest potential for both sublime success and catastrophic failure. In minimalism, where every object carries significant visual weight, choosing a fixture that is intentionally and confidently oversized is a bold, sculptural act. Choosing one that is accidentally or timidly oversized, however, will crush a room’s proportions and create a sense of oppression.
The error is not in going big, but in failing to understand the relationship between the fixture’s volume and the room’s negative space. A successful oversized piece doesn’t just fill space; it defines it. It should feel intentional, like a large sculpture in a gallery, with ample “breathing room” around it. If it feels cramped or crowds other elements, it fails. As interior design expert Erica McLain notes, the goal is a delicate balance.
Scale and proportion are essential to creating a space that feels both visually harmonious and emotionally comfortable. They ensure that every element contributes to a cohesive and balanced design.
– Erica McLain, Scale in Interior Design — An Expert’s Guide to Size
An undersized fixture, by contrast, is a quieter mistake but equally damaging to a minimalist aesthetic. It creates a visual void and communicates a lack of confidence. The eye registers it as an afterthought rather than a deliberate anchor. In a sparse room, a small fixture fails to create the necessary focal point, leaving the space feeling unmoored and incomplete. The greater sin in minimalism is timidity, not boldness. Choosing a fixture that is just slightly too small is often worse than choosing one that is dramatically too large.
The decision between oversized and undersized is a commitment to a specific artistic statement. To succeed with an oversized fixture, you must embrace its dominance and design the rest of the space in deference to it. It is the sun, and all other elements are its planets. To choose an undersized one is to abdicate the role of a focal point altogether.
How to Light a Statement Armchair for Dramatic Evening Impact?
A statement fixture’s artistry is not confined to its own form; its true power is revealed in how its light interacts with other objects in the room. In a minimalist setting, a beautifully designed armchair can serve as a secondary sculpture. By day, its form is clear. By night, under generic ambient light, its texture and shape can flatten into a mere silhouette. However, by using a specific lighting technique, you can transform it into a dramatic focal point, revealing its tactile qualities and sculptural lines.
This technique is known as Light Grazing. It involves positioning a light source at a sharp, low angle to the surface of an object. Instead of illuminating it from above, the light “grazes” across its texture. This method is the secret to revealing the deep nap of velvet, the nubby loops of bouclé, or the rich grain of leather. The low-angle light creates long, dramatic shadows in the fabric’s crevices, turning a simple surface into a three-dimensional landscape of highlight and shadow. This is how you make texture visible from across the room.
To achieve this effect, you don’t necessarily need a separate lamp. A large, low-hanging arc floor lamp is a perfect tool. By positioning the head of the lamp so its light rakes across the armchair’s surface, you can achieve a powerful grazing effect. An oversized, multi-pendant chandelier can also be used strategically, where one of its lower-hanging elements is positioned to cast this angular light. The goal is to move beyond simple illumination and begin painting with shadows. This interplay between the primary light sculpture and the secondary furniture sculpture creates a layered, sophisticated visual dialogue that is the hallmark of masterful minimalist design.
You are no longer just lighting a chair; you are revealing its soul. The light doesn’t just show you the object; it tells you how to feel about it, transforming a simple reading nook into a pocket of intimate drama.
The Recessed Lighting Mistake That Casts Shadows on Sculptures
In a room anchored by a sculptural light fixture, all other light sources become the supporting cast. Their job is to enhance, not compete with, the star of the show. The most common mistake is using recessed downlights improperly. When standard recessed lights are placed directly over a statement chandelier or pendant, they create harsh, downward shadows that flatten the fixture’s three-dimensional form—a phenomenon known as “pancaking.” This effectively sabotages the very piece you’re trying to highlight, making it appear dead and one-dimensional.
The correct approach is to use recessed lighting to illuminate the surrounding surfaces, not the fixture itself. This is a strategy of indirect lighting. Instead of pointing lights down, use adjustable “gimbal” fixtures or “wall washers” angled toward the walls. By lighting the vertical planes behind and around your statement piece, you create a soft, glowing backdrop. This technique does two things: first, it makes the room feel larger and more open. Second, it causes your sculptural fixture to pop in dramatic silhouette against the illuminated wall. The fixture’s form is defined by the light behind it, preserving its shape and visual power.
Case Study: The Solent Project’s Backlighting Strategy
In a luxury minimalist mansion project, the design team at Hampshire Light faced the challenge of illuminating spaces with bold, sculptural fixtures without diminishing their impact. As detailed in their analysis of the Solent project, they deliberately avoided overhead downlights. Instead, they placed adjustable recessed fixtures at precise 30-degree angles to wash the walls behind the statement pieces. This created a luminous backdrop that threw the fixtures into beautiful silhouette, while side lighting from other angles revealed their three-dimensional form. The result was a space where the architectural strength was enhanced by light that defined form without overwhelming it.
This strategy is fundamental to the concept of Sculptural Luminance. You are using the supporting lights to “carve” the main fixture out of the darkness. The shadows become as important as the light, defining edges and creating depth. Your recessed lighting should be the quiet stagehands, working in the background to ensure the lead actor always looks its absolute best.
Key Takeaways
- True statement lighting is an act of sculpting space with light, not just placing a decorative object.
- Technical excellence is the foundation of artistry: high-CRI bulbs, proper scale, and dimmable controls are non-negotiable.
- The most successful minimalist interiors use a single, confident fixture as an anchor, creating harmony through a “Zone of Influence” and “Visual Echoing.”
How to Anchor a Room With One Statement Piece Without Overwhelming It?
The ultimate goal of this entire approach is to have a single object—your statement fixture—anchor an entire room, providing both focus and function without overwhelming the minimalist aesthetic. Success hinges on a delicate balance of dominance and restraint. The fixture must be the undeniable protagonist, yet it must also feel perfectly integrated into its environment. This is achieved through two advanced but critical concepts: creating a Zone of Influence and practicing Visual Echoing.
The Zone of Influence is the functional and psychological space defined by the pool of light your fixture casts. In a minimalist living room, the light from a large arc lamp might define the conversation area; in a dining space, the glow of a pendant delineates the table. This zone becomes a room-within-a-room, an invisible architecture that grounds the furniture within it. Everything outside this zone falls into softer, secondary light, creating a clear visual hierarchy. This prevents the room from feeling like one vast, undefined space and gives it purpose and intimacy.
Visual Echoing is the technique that weaves the dominant fixture into the subtle fabric of the room. Rather than matching everything, you create quiet “echoes” of the fixture’s material, color, or form in a few small, distant details. For example, a bold, sculptural brass chandelier might be echoed by the thin brass legs of a side table, the frame of a mirror across the room, or a simple brass bowl on a shelf. These subtle repetitions create a sense of intentionality and cohesion. The eye picks up on the connection subconsciously, making the bold fixture feel like it truly belongs in the space, rather than having just landed there. This is the definition of a well-composed work of art, where every element speaks to the others.
Minimalist lighting is an approach that prioritises simplicity in form, function and placement. Rather than drawing attention to the light fittings themselves, it focuses on the effect the light creates within a space.
– Hampshire Light Design Team, Minimalist Lighting, Maximum Impact: Subtle Solutions for Luxury Homes
By mastering the Zone of Influence and Visual Echoing, you elevate your statement piece from a mere object to the gravitational center of your design. It holds the room together, providing a powerful focal point that feels both inevitable and serene, the very essence of sophisticated minimalism.
Begin today to see your lighting not as an accessory, but as the primary artistic tool for shaping your home. By shifting your perspective from the object to the light it casts, you can create a space that is not only visually stunning but also deeply resonant and alive.