Successfully integrating sculpture into a home is a structural engineering challenge, not a decorative afterthought.
- Properly engineered niches and reinforced walls require planning from the blueprint stage to manage load paths and ensure long-term stability.
- Advanced lighting and the deliberate use of negative space are what separate a simple cutout from a museum-quality architectural feature.
Recommendation: Collaborate with your architect and a structural engineer early in the design process to define art locations, as these decisions will dictate framing, lighting, and foundational requirements.
For homeowners and designers poised at the blueprint stage, the ambition to integrate significant artwork often begins with a simple idea: an alcove for a favorite sculpture. The common approach treats this as a decorative task—a matter of dimensions and paint. This perspective, however, is the primary source of failure in creating a truly art-centric home. Standard advice to “measure your art” or “add a spotlight” barely scratches the surface of a discipline that merges art curation with structural engineering. These alcoves are often relegated to afterthoughts, carved out of available drywall with little consideration for the profound impact they have on a space’s architectural narrative.
But what if the entire premise was inverted? What if, instead of fitting art into a house, the house was fundamentally designed around the art? This is the pivotal shift from decoration to architecture. It requires moving beyond the superficial and embracing the technical realities of weight, light, and human perception. This guide reframes the conversation. It is not about cutting a hole in a wall; it is about the structural and philosophical commitment to designing space where the architecture itself becomes the primary frame for the art it houses. It’s about engineering a void, mastering shadow, and understanding that the wall’s integrity is as important as the art it supports.
We will deconstruct this architectural process, moving from foundational principles to advanced execution. We will explore the critical calculations for dimensioning, the physics of lighting, the structural choices between integrated niches and freestanding plinths, and the engineering required to support significant weight. Finally, we will examine the profound role of negative space and outline a collaborative framework for ensuring your home is not just a container for art, but a cohesive dialogue with it.
Table of Contents: A Blueprint for Art-Centric Architectural Features
- How to Dimension Art Niches for Versatility Over Decades?
- The Recessed Lighting Mistake That Casts Shadows on Sculptures
- Standalone Plinth vs Built-in Niche: Which Suits Modern Architecture?
- How to Reinforce Walls for Sculptures Exceeding 50kg?
- Why Does Negative Space Around Sculpture Define Luxury?
- Why Do Standard Drywall Studs Fail With Museum-Grade Art?
- Why Does the Eye Need Negative Space Around Bold Objects?
- How to Collaborate With Architects to Design Art-Centric Homes?
How to Dimension Art Niches for Versatility Over Decades?
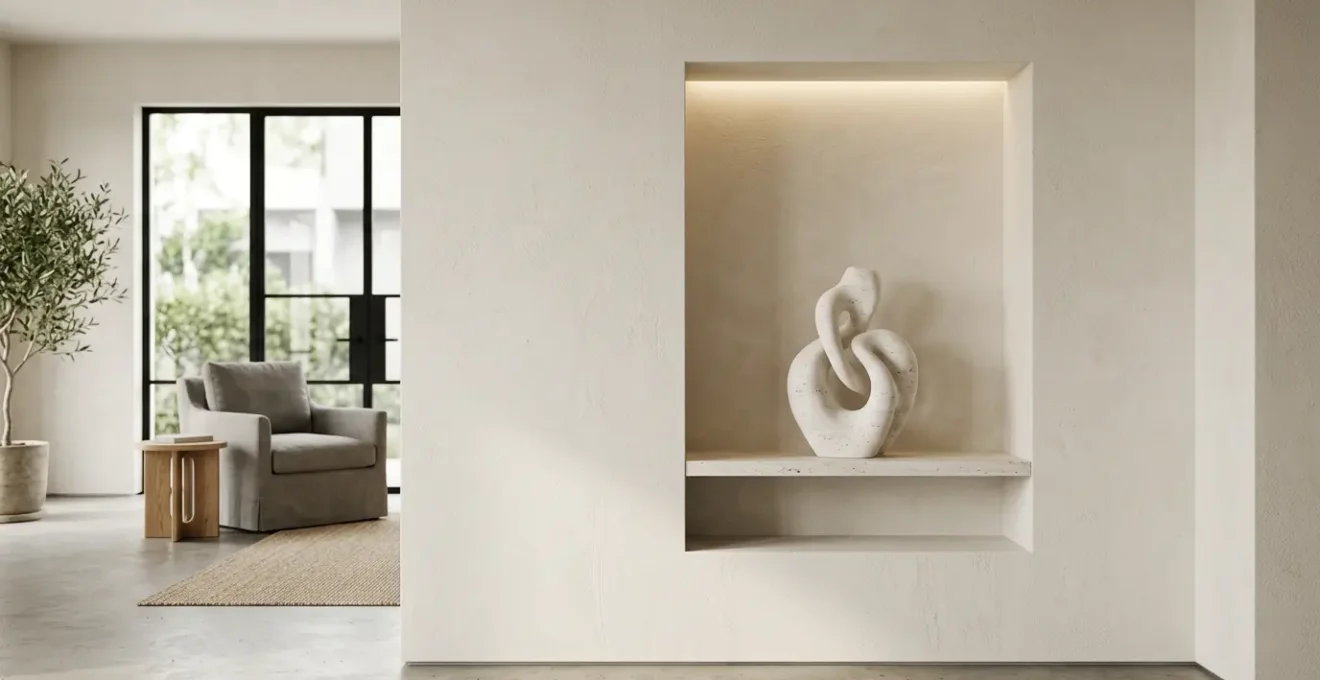
Dimensioning an art niche is an act of foresight, not a simple reaction to a current piece of art. A home’s lifecycle spans decades, and collections evolve. Therefore, the goal is not to create a perfect-fit container for one object, but an architecturally-balanced stage that can gracefully accommodate future acquisitions. This requires thinking in terms of proportion and sightlines rather than mere measurements. The most successful niches adhere to classical aesthetic ratios that are inherently pleasing to the human eye. According to sculptural design guidelines, a 2:3 or 3:4 width-to-height ratio provides a versatile and visually stable frame.
Beyond the ratio, the niche’s absolute size and depth are critical. It must command presence without overwhelming the wall it inhabits. Consider these structural and visual parameters:
- A minimum size of 24 inches wide by 36 inches high is recommended to establish a clear visual anchor in a room.
- Conversely, exceeding 36 inches wide by 42 inches high can cause the niche to dominate the architecture, becoming a void rather than a feature.
- The depth is non-negotiable for sculptural display. A minimum of 12 inches is required to allow for the layering of objects and to create depth with lighting.
- Crucially, the artwork should not fill the space. A guiding principle is to leave 30-40% of the volume as negative space, allowing the piece to breathe and preventing a cluttered, suffocating appearance.
Finally, the placement of the niche itself is a strategic decision. It should be positioned based on the primary viewing sightlines from key locations in the room—the entrance, a seating area, or a transitional hallway. The niche is not just an indent; it’s a destination for the eye, an engineered void designed to create a contemplative pause in the experience of the home.
The Recessed Lighting Mistake That Casts Shadows on Sculptures
The most common error in illuminating an art niche is to treat it like any other part of a ceiling. A single, centered recessed downlight—the default solution for hallways and closets—is an act of sabotage for sculptural art. This approach creates harsh, vertical “hot spots” on the top of the sculpture and plunges its vertical faces into deep, unflattering shadow. It flattens three-dimensional form, obscures texture, and fundamentally misinterprets the goal of art lighting, which is to reveal form, not merely to illuminate a space.
True sculptural lighting is a nuanced discipline that uses multiple light sources and specific angles to model an object. Instead of one fixture, a professional design considers a combination of techniques. Wall-grazing, where light is cast down the back wall of the niche, can create a dramatic silhouette and highlight the texture of the wall itself. Accent lighting, often from adjustable, low-profile fixtures placed at the front of the niche, is used to “wash” the object with a soft, directed beam that defines its contours. For certain pieces, subtle backlighting or uplighting can introduce a halo effect and a sense of weightlessness.
As this detailed view of a sculptural surface demonstrates, different lighting strategies achieve radically different effects. Notice how raking light reveals every tiny crevice and texture, while a softer wash models the overall form, and backlighting separates the object from its background. The key is control: using the right beam angle (narrow for accenting, wide for washing), ensuring a high Color Rendering Index (CRI) of 90+ to show true colors, and using dimmers to balance the intensity. The lighting should feel integrated and intentional, sculpting the art with shadow and highlight rather than blasting it with uniform brightness.
Standalone Plinth vs Built-in Niche: Which Suits Modern Architecture?
The decision between integrating a built-in niche or featuring a standalone plinth is a fundamental architectural choice that defines how art interacts with space. This is not merely a question of style but of spatial philosophy. A niche is an act of carving space *out of* the architecture, creating a recessed destination that draws the viewer inward. In contrast, a plinth is an act of placing a sculptural object *into* the flow of a room, demanding engagement from multiple angles and shaping circulation around it. Modern architecture, with its emphasis on open plans and material honesty, can accommodate both, but their implications are profoundly different.
A built-in niche is a permanent commitment. It becomes part of the home’s unchangeable fabric, ideal for frontal artworks that are best appreciated from a specific vantage point. It offers a high degree of security and protection, framing the piece within a controlled, contemplative environment. A standalone plinth, however, offers flexibility. It is an object in itself, allowing for the repositioning of art as a collection grows or as the use of a space evolves. It is the superior choice for multi-faceted works that demand 360-degree viewing, transforming the artwork into a dynamic centerpiece rather than a static feature.
The following table breaks down the core functional and aesthetic differences to guide this critical architectural decision.
| Feature | Built-in Niche | Standalone Plinth |
|---|---|---|
| Viewing Engagement | Draws eye and body inward, creates contemplative pause | Directs flow around it, engages with open space |
| Ideal Sculpture Type | Frontal pieces best viewed from one direction | Multi-faceted works demanding 360-degree viewing |
| Spatial Impact | Integrated into architecture, recessed destination | Freestanding focal point, sculptural presence |
| Installation Requirement | Permanent structural modification during construction | Flexible, movable, adaptable to changes |
| Security Level | High – protected by recess, reduced physical contact | Moderate – exposed, requires stability consideration |
| Elevation Function | Fixed at designed height within wall | Raises sculpture 1/3 to 1/2 of artwork height for grandeur |
Ultimately, the choice hinges on intent. If the goal is to create a seamless, integrated art experience that is fused with the home’s structure, the niche is the architecturally pure solution. If the goal is to create a dynamic, gallery-like environment that prioritizes curatorial freedom and the sculptural presence of objects in open space, the plinth is the more versatile instrument.
How to Reinforce Walls for Sculptures Exceeding 50kg?
Supporting a sculpture that weighs more than 50kg (approx. 110 lbs) is not a drywall and anchor problem; it is a structural engineering problem. Standard residential walls, typically framed with wood or light-gauge metal studs at 16 or 24-inch intervals, are designed to support drywall and minimal shear loads, not significant, concentrated point loads. Attempting to hang heavy art with conventional anchors will lead to material fatigue, drywall crushing, and catastrophic failure. The weight must be transferred away from the superficial wall covering and onto the building’s primary structure through a pre-planned load path.
Reinforcement must be designed into the wall framing itself during the construction or major renovation phase. This involves replacing standard studs with more robust materials or adding supplementary blocking. The most common professional method is to install solid wood or plywood blocking horizontally between the vertical studs, creating a large, solid surface to which mounting hardware can be securely bolted. For even heavier pieces, architects may specify Laminated Veneer Lumber (LVL) studs or steel framing, which offer superior dimensional stability and load-bearing capacity. The goal is to create an uninterrupted structural connection from the artwork’s mounting bracket, through the framing, and down to the floor joists and foundation.
Case Study: The 68kg Root Sculpture Installation
A professional art installation team was tasked with securing a 150-pound (68kg) gold leaf root sculpture. The project required a five-person crew and specialized rigging, including a 500-pound chain puller. Crucially, success depended on significant structural wall modification to create the necessary load-bearing capacity. This real-world example demonstrates that artworks exceeding 50kg are far beyond the scope of standard wall anchors and demand an engineered solution designed before the walls are closed.
The mounting hardware itself is also a critical component. For heavy or irregularly shaped sculptures, custom-fabricated steel brackets or French cleat systems are often necessary to distribute the load effectively. These are not off-the-shelf items; they are designed by art installation specialists or structural engineers in response to the specific artwork and wall structure.
Action Plan: Your Structural Reinforcement Audit
- Structural Contact Points: Identify and map all planned points of contact for the artwork, including the specific wall, floor, or ceiling surfaces involved in the load path.
- Artwork Specification Collection: Create a definitive inventory of the artwork’s precise specifications, including verified weight, exact dimensions, material composition, and the location of any built-in hanging points.
- Load Requirement Analysis: Confront the artwork’s load requirements with the existing or planned structural blueprints, specifically assessing stud type, material, spacing, and the intended drywall finish.
- Risk & Failure Point Assessment: Evaluate potential failure modes under both static and dynamic (e.g., seismic) loads, identifying weaknesses such as shear stress on fasteners, material fatigue, or insufficient blocking.
- Reinforcement Integration Plan: Develop a formal reinforcement plan that specifies the exact materials (e.g., steel plate, LVL, plywood blocking) and fastening methods to be integrated into the master architectural drawings.
Why Does Negative Space Around Sculpture Define Luxury?
In luxury interior design and architecture, the ultimate statement of value is not what is present, but what is deliberately absent. Negative space—the “empty” area surrounding an object—is the most potent tool for creating emphasis, hierarchy, and a sense of calm. When a room is filled with objects, the eye has nowhere to rest, and the brain receives a constant barrage of stimuli. By contrast, surrounding a single, significant sculpture with a generous expanse of negative space communicates control, intention, and confidence. It signals that the space itself is a luxury, too valuable to be cluttered.
Negative space is the deliberate absence of objects. It’s the breathing room that allows architecture, proportion, and select pieces to register with clarity. Rather than feeling empty, good negative space feels intentional—it gives the eye pause, creates hierarchy, and allows a room to feel composed rather than crowded.
– Philip Thomas Vanderford, Studio Thomas James, Homes and Gardens interview
This principle is the foundation of every major art gallery and museum. A masterpiece is never crowded by another; it is given its own wall, its own room, its own context. This isolation forces the viewer to focus, to contemplate the piece without distraction. In a residential setting, applying this concept elevates a home from a collection of possessions to a curated environment. The “breathing room” around a sculpture allows its form, material, and the play of light across its surface to become the dominant story. It transforms the object from a mere decoration into a focal point of architectural significance.
This is why designing for negative space must happen at the blueprint stage. It requires planning walls that are intentionally left bare and designing circulation paths that lead the eye toward a carefully placed focal point. This generous allocation of space is a non-verbal cue of high-end design, evident in premium hotels, galleries, and architect-designed homes. It is an investment in tranquility and focus, allowing the inherent beauty of both the art and the architecture to be fully appreciated.
Why Do Standard Drywall Studs Fail With Museum-Grade Art?
The failure of standard residential construction materials in the context of museum-grade art installation is not primarily about catastrophic collapse, though that is a risk. The more pervasive failure is one of execution and finish. High-end architectural design is defined by precision: razor-sharp edges, perfectly plumb lines, and seamless surfaces. Standard wood studs and drywall are simply not engineered for this level of tolerance. Wood studs can warp, twist, or shrink as they dry, causing subtle but visible imperfections in the final wall surface. Drywall is a soft material, easily damaged and incapable of holding the crisp, clean lines that define a flawlessly executed niche or recessed feature.
The core issue isn’t just collapse; it’s the inability of standard materials to hold the perfect, razor-sharp edges and plumb lines that high-end architectural finishes demand. The material itself limits the quality of the execution.
– Professional Art Installation Analysis, Union Fine Art Services Installation Guide
This concept of dimensional stability is paramount. For museum-quality results, architects and specialized installers turn to materials that resist environmental changes. Light-gauge steel studs, for example, are perfectly straight and do not warp with humidity. When combined with plywood sheathing and high-quality plaster finishes instead of standard drywall mud, they provide a far more stable and durable substrate. This robust construction is what allows for the creation of perfect, knife-edge returns on a niche or the seamless integration of flush-mounted lighting and hardware.
Case Study: Heavy Stone Relief Installation
The installation of a large-scale, heavy stone relief sculpture highlighted the inadequacy of common methods. Adhesive-based mounting failed due to the sheer weight and the material’s natural expansion and contraction. The only successful professional solution involved purely mechanical fasteners: a system of brackets bolted directly to purpose-installed metal studs at precise 18-inch intervals. This demonstrates that for permanent, heavy art, dimensional stability and mechanical fastening are non-negotiable, and standard residential framing is fundamentally unsuited for the task.
In essence, using standard materials for a high-end art installation is like trying to sculpt marble with a wooden spoon. The material itself imposes a ceiling on the quality of the final product. Achieving a result that feels truly integrated and architecturally sophisticated requires an upfront investment in a superior structural system.
Why Does the Eye Need Negative Space Around Bold Objects?
The human visual system is not a passive camera; it is an active information-seeking mechanism. To process our environment efficiently, our brains rely on a system of focus and peripheral filtering. When confronted with a cluttered scene, the eye has no clear focal point and jumps between objects, creating a state of low-level cognitive stress. This is a primal response: in a cluttered natural environment, threats could be hidden anywhere. According to luxury interior design research on human spatial experience, when a room is overfilled, the eye has nowhere to rest and the body subconsciously tenses.
Negative space serves as a powerful cognitive tool to counteract this. By creating a “void” around a bold object like a sculpture, we are giving the brain a clear instruction: “Look here. This is important.” The absence of competing visual information allows the eye to settle and the brain to dedicate its full processing power to the object of focus. This creates a physiological sense of calm and order, often described as a “contemplative pause.” The object is not just seen; it is perceived with greater depth and clarity.
This neurological function is why negative space is so crucial for bold or complex artworks. The empty space acts as a silent frame, isolating the piece from the visual noise of its surroundings. It allows the viewer to appreciate the subtle contours of a sculpture, the interplay of light and shadow, and the texture of its material without the brain having to simultaneously process a nearby lamp, a stack of books, and a patterned rug. The “emptiness” is not empty at all; it is an active functional element that directs attention and facilitates a deeper, more meaningful connection with the art.
Key Takeaways
- Structural First: Art integration is an engineering task. Reinforcement, load paths, and material stability must be planned at the blueprint stage.
- Light is Form: The purpose of lighting is not illumination but to sculpt and reveal the three-dimensional form of the artwork. Avoid single downlights.
- Space is Luxury: Negative space is an active element that directs focus, creates a sense of calm, and communicates high-end design. It is more important than the objects it surrounds.
How to Collaborate With Architects to Design Art-Centric Homes?
The creation of an art-centric home is the result of a deliberate and early partnership between the homeowner, the architect, and the structural engineer. The most significant mistake is treating art as a final decorative layer to be applied after the home is built. True integration requires that conversations about the art collection happen at the very beginning of the design process, during the schematic design phase. This is when foundational decisions about wall locations, ceiling heights, and structural systems are made.
The key to success in integrating art in a meaningful way is to discuss the vision and goal with the design team early in the process, so the most prominent pieces are seamlessly fused with the design. Conversations about art integration must happen at the very beginning, not after floor plans are done.
– EYRC Architects, Art Niche: How to Incorporate Art in Your Home Design
A successful collaboration begins with a comprehensive inventory of the art collection. This is not just a list of titles, but a technical document detailing the dimensions, weight, material, and specific lighting requirements of each key piece. With this data, the architect can begin to think of the home as a gallery, designing specific walls as “feature walls,” planning circulation paths that create deliberate contemplative moments, and allocating the necessary structural support for heavy works. This might involve placing a major sculpture at a key transition point, like a stair landing, or at the terminus of a long hallway to act as a powerful focal point.
The homeowner’s role is to articulate the narrative goals. What is the story the collection should tell? Which pieces are the protagonists? This qualitative information, combined with the quantitative data, allows the design team to make informed architectural moves. The process should follow a clear roadmap to ensure nothing is left to chance:
- Inventory Early: Document dimensions, weight, material, and lighting needs for every significant piece before design begins.
- Articulate Narrative: Explain the emotional impact and story you want the collection to create within the home’s spaces.
- Engage at Schematic Design: Integrate art placement into the initial architectural floor plans, not as an afterthought.
- Create Contemplative Moments: Work with the architect to position art at key transition points to create powerful visual destinations.
- Design the Load Path: Coordinate with a structural engineer to transfer the weight of any heavy sculptures safely to the foundation.
- Consider Isolation: For priceless or sensitive works, discuss “box-in-a-box” construction to protect the art from structural vibration.
To transform these principles into a physical reality, the essential next step is to engage a design and structural team before the first floor plan is finalized. This proactive collaboration is the only path to creating a home where art and architecture exist in a seamless, powerful, and lasting dialogue.