In summary:
- Choose surface finishes like lime wash for evolving patina or Venetian plaster for polished depth to establish the room’s core sensory identity.
- Use lighting as a sculpting tool; position downlights for “wall grazing” to create dramatic shadows that reveal and animate texture.
- Layer textures strategically, using a “sensory hierarchy” of hero, secondary, and tertiary materials to build complexity without adding color.
- Consider the acoustic properties of 3D panels and the immersive potential of bold wallpaper to engage senses beyond just touch and sight.
The mark of a truly luxurious interior is not just what you see, but what you feel. In a world saturated with pristine, monochromatic spaces, a plain drywall surface, however perfectly painted, can evoke a sense of sensory flatness—a quiet, sterile void. The common impulse is to populate this void with colorful art or textured furnishings like bouclé chairs and velvet pillows. While these elements have their place, they are accents within the space, not the space itself. They distract from the flatness rather than solving it at its source: the walls that define the room’s volume and character.
What if the solution was not to add more objects, but to imbue the very surfaces of the room with a life of their own? The true art of elevating a monochromatic room lies in moving beyond simple decoration to engage in a haptic dialogue. This involves the intentional manipulation of surface, light, and material memory to create an environment that invites touch, engages the eye with subtle complexity, and even shapes the sound within. It’s about transforming the walls from static backdrops into active participants in the sensory experience of the home.
This guide delves into the specialist techniques and material choices that turn flat walls into dynamic, tactile landscapes. We will explore the nuances of different finishes, the science of lighting to reveal texture, the practicalities of maintenance, and the strategies for layering materials to create a space that is rich, sophisticated, and deeply engaging, all without adding a single drop of contrasting color.
Summary: A Specialist’s Guide to Tactile Walls in Monochromatic Design
- Lime Wash vs Venetian Plaster: Which DIY Finish Is More Forgiving?
- How to Position Downlights to Graze Textured Walls Effectively?
- The Cleaning Challenge: How to Dust Rough Stone Cladding?
- Do 3D Wall Panels Actually Reduce Echo in Home Cinemas?
- How to Patch a Hole in Venetian Plaster Without It Showing?
- The Lighting Mistake That Flattens Your Impasto Paintings
- How to Layer Textures to Avoid the ‘Boring Beige’ Trap?
- How to Apply Bold Wallpaper in Small Powder Rooms for Maximum Impact?
Lime Wash vs Venetian Plaster: Which DIY Finish Is More Forgiving?
The choice between lime wash and Venetian plaster is a foundational decision in creating a tactile interior, representing two distinct philosophies of texture. It’s not merely a matter of finish, but of embracing either organic imperfection or monolithic perfection. Lime wash, with its chalky, suede-like appearance, is the embodiment of Wabi-Sabi. Its application with painterly brush strokes is a meditative process that celebrates inconsistency. This finish has a living quality, or a “material memory,” developing a subtle patina over time as it interacts with the room’s humidity and light. Its forgiving nature makes it highly suitable for DIY application, as variations in application only add to its character. The material cost is also relatively accessible, often running between $40-$80 per gallon.
In contrast, Venetian plaster aims for a seamless, marble-like surface with a cool, polished feel and a reflective sheen. Achieving this requires a physically demanding process of applying multiple thin layers with a trowel, followed by a meticulous burnishing technique. While the result is incredibly durable and ideal for high-traffic areas, it is unforgiving of error. Imperfections in application are seen as flaws, not features, making it a craft best left to seasoned professionals or the most dedicated and well-practiced DIY enthusiast. The surface is sealed and impermeable, designed to remain static and timeless, unlike the ever-evolving nature of lime wash.
This comparative table, based on an analysis of textured wall finishes, clarifies the key distinctions for anyone considering these applications.
| Characteristic | Lime Wash | Venetian Plaster |
|---|---|---|
| Finish Appearance | Matte, textured, embraces imperfection (Wabi-Sabi) | Smooth, polished, marble-like with reflective sheen |
| Application Method | Painterly brush strokes, meditative process | Multiple trowel layers with burnishing, physically demanding |
| DIY Friendliness | Very DIY-friendly, forgiving of imperfections | Requires professional expertise or extensive practice |
| Breathability | Highly breathable, allows moisture passage, natural mold resistance | Sealed, impermeable surface when polished |
| Aging Character | Develops patina over time, evolves with humidity | Designed to remain static, maintains original appearance |
| Durability | May require periodic reapplication | Highly durable, minimal maintenance, ideal for high-traffic areas |
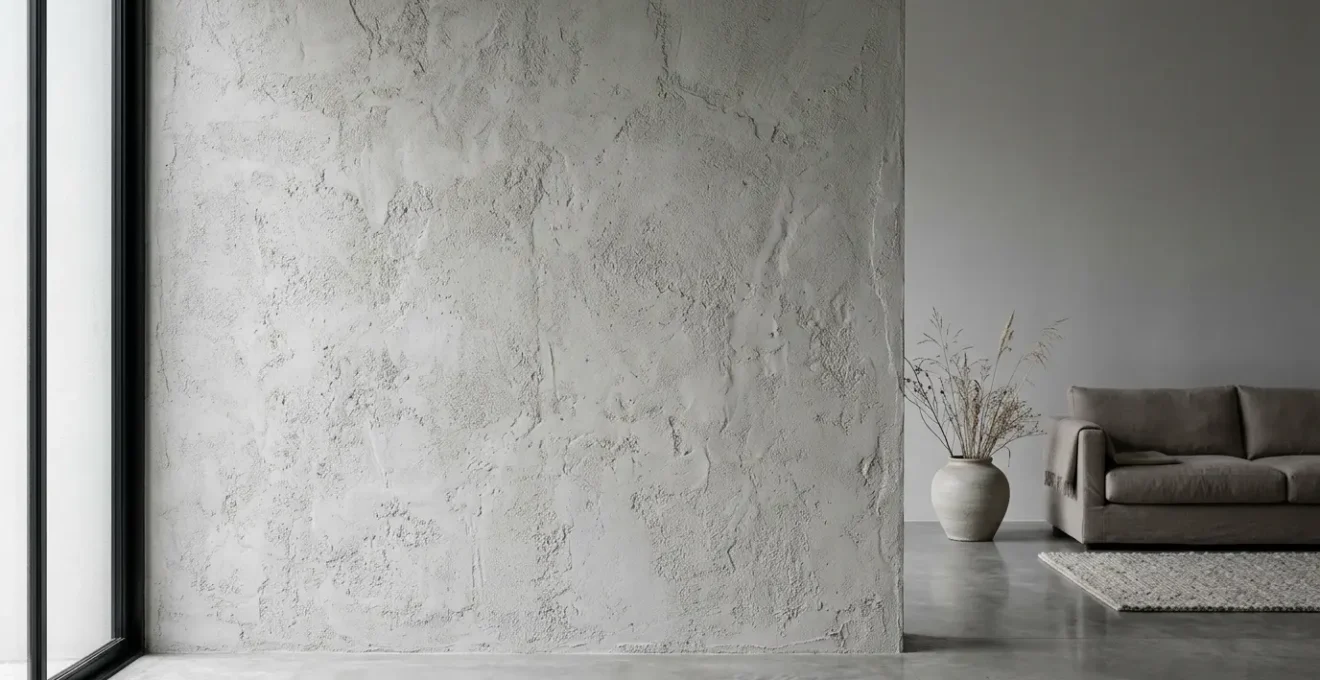
How to Position Downlights to Graze Textured Walls Effectively?
A textured wall without proper illumination is a missed opportunity. The secret to revealing its depth and character lies not in flooding it with light, but in a precise technique known as wall grazing. This is the art of light sculpting, where directional light is cast at a sharp angle across a surface to create dramatic, elongated shadows in every crevice and recess. Unlike wall washing, which aims to create a smooth, even field of light that flattens texture, grazing is designed to exaggerate it. This technique is what transforms a subtly finished plaster wall or a rough stone cladding from a flat plane into a dynamic, three-dimensional landscape.
Achieving an effective grazing effect requires meticulous planning of fixture placement and specifications. The goal is to create a “curtain of light” that rakes across the surface. This is a technical execution, not an accident of placement.
As the image demonstrates, the sharp angle of the light source is critical. Key professional guidelines for setting up this effect include:
- Positioning fixtures 6-12 inches from the wall surface. Any further, and the effect softens into a wash.
- Specifying narrow beam angles, typically 10 degrees or less, to create crisp, defined shadows.
- Maintaining a 1:1 spacing-to-setback ratio between fixtures to ensure a continuous and uniform light effect without dark spots.
- Selecting the right color temperature to complement the material: a warm 2700K light enriches the appearance of wood and plaster, while a neutral 3000K reveals the true colors of stone.
The Cleaning Challenge: How to Dust Rough Stone Cladding?
The very quality that makes rough stone cladding so visually appealing—its deep, irregular texture—also presents its greatest practical challenge: cleaning. Dust and debris inevitably settle into the crevices, and improper cleaning can not only be ineffective but can also damage the stone’s surface or release dust into the air. A simple feather duster often proves inadequate, merely moving dust around. For a luxury homeowner, maintaining the pristine appearance of such a feature wall is paramount, requiring a technique that is both gentle and thorough.
The professional solution is a two-handed technique that captures dust at the source. This method involves using a large, soft-bristle brush (such as a horsehair detailing brush) to gently sweep dust in a downward motion. Simultaneously, the nozzle of a vacuum cleaner with a brush attachment is held just below the area being brushed. This immediately captures the dislodged debris before it has a chance to become airborne and resettle elsewhere. This systematic approach ensures a comprehensive clean without abrading the stone’s surface.
Beyond regular cleaning, preventative measures are key. Applying a breathable, matte-finish penetrating sealer upon installation can significantly reduce the stone’s porosity. This makes it harder for dust to adhere without altering the natural, non-glossy appearance of the stone. When dealing with spot stains, it’s crucial to use a pH-neutral cleaner for sensitive stones like limestone and to always blot the stain, never rub, to avoid spreading it or damaging the texture.
Action Plan: Maintaining Rough Textured Surfaces
- Initial Assessment: Identify all rough textured surfaces (stone, brick, heavy plaster) and their specific material type (e.g., limestone, granite) to determine cleaning needs.
- Tool Acquisition: Procure a large soft-bristle brush (horsehair recommended) and a vacuum cleaner with a dedicated brush attachment for the two-handed technique.
- Preventative Sealing: Check if surfaces were sealed upon installation. If not, research and apply a breathable, matte-finish penetrating sealer appropriate for the material to reduce dust adhesion.
- Spot Cleaning Protocol: Create a spot-cleaning kit with a pH-neutral cleaner and microfiber cloths. Establish a “blot, don’t rub” rule for all stain removal attempts.
- Scheduled Maintenance: Integrate the two-handed dusting technique into a regular cleaning schedule (e.g., monthly) to prevent significant dust buildup.
Do 3D Wall Panels Actually Reduce Echo in Home Cinemas?
In the design of a home cinema or media room, aesthetics and acoustics must converge. While 3D wall panels are often chosen for their dramatic visual impact, their primary functional role in such spaces is acoustic shaping. To understand their effectiveness, it is crucial to distinguish between two different acoustic goals, as experts at Arturel Acoustics explain:
Sound absorption improves the sound quality inside a room, while soundproofing blocks sound from entering or leaving it. Absorption is about managing what happens to sound energy after it is generated in a room.
– Arturel Acoustics, The Science of Acoustic Panels Explained
3D panels are tools for absorption, not soundproofing. They are designed to combat echo (reverberation) and flutter by trapping sound waves, preventing them from bouncing endlessly off hard surfaces. This clarifies dialogue, tightens bass response, and creates a more immersive and less fatiguing listening experience.
The effectiveness of an acoustic panel is measured by its Noise Reduction Coefficient (NRC), a rating from 0 to 1 indicating how much sound it absorbs. A panel with an NRC of 0.7 absorbs 70% of the sound that strikes it. Performance is directly tied to the panel’s material and thickness. According to acoustic performance testing, 2-inch acoustic panels can achieve an NRC of 1.0, meaning they absorb virtually 100% of the sound waves they encounter. It’s a common misconception that entire walls must be covered. In reality, treating just 15-20% of the wall surface area with high-performance panels can significantly reduce echo and dramatically improve a room’s sound quality.
Therefore, 3D panels are not merely decorative. When specified correctly—made from absorptive materials like high-density foam or mineral wool and not just hard plastic or wood—they are a highly effective tool for acoustic treatment. They work by combining two principles: absorption from the material itself and diffusion from their three-dimensional shapes, which scatter sound waves to further break up echoes.
How to Patch a Hole in Venetian Plaster Without It Showing?
A hole or a deep scratch in a Venetian plaster wall can feel catastrophic. The beauty of this finish lies in its seamless, monolithic quality, where the surface flows uninterrupted, reflecting light in a continuous, subtle dance. A patch, therefore, threatens to become a visually jarring scar, a “hot spot” with a different sheen or texture that draws the eye and shatters the illusion. Unlike with painted drywall, a simple spackle-and-sand job is not an option. Repairing Venetian plaster is a delicate art of recreating not just the surface, but its history and finish.
The key to an invisible repair is a technique called feathering. This involves applying numerous, paper-thin layers of plaster, extending each layer slightly beyond the previous one. This gradual blending should be carried out over a wide area, often 10-12 inches beyond the original hole, to seamlessly transition the texture and sheen of the patch into the surrounding wall. It is absolutely crucial to use leftover material from the original application. Even the same product from a new batch can have minute variations in color and composition that will be visible upon drying.
After feathering, the most critical step is to re-burnish the repaired area. Using the edge of a clean trowel at the correct pressure, the patch must be polished to precisely match the reflective quality of the original wall. This requires a sensitive touch, as over-working the area can create a shiny hot spot just as disruptive as the original damage. If an invisible repair proves impossible, a sophisticated alternative is to embrace the philosophy of Kintsugi—the Japanese art of repairing broken pottery with gold. Rather than hiding the damage, one can turn it into a feature by embedding a contrasting material, such as a polished brass disc or a piece of stone, into the wall, transforming a flaw into a deliberate, beautiful detail.
The Lighting Mistake That Flattens Your Impasto Paintings
The same principles of light sculpting that apply to textured walls are even more critical when illuminating artworks with physical depth, such as paintings created with an impasto technique. Impasto involves applying thick, sculptural layers of paint that stand up from the canvas, creating their own topography of peaks and valleys. This three-dimensional quality is an integral part of the artist’s expression. The most common lighting mistake is to illuminate such a piece with diffuse, frontal light, such as from a general ceiling fixture. This flat lighting erases the micro-shadows that define the texture, effectively turning a sculptural work back into a two-dimensional image and silencing its tactile voice.
To make an impasto painting truly come alive, the light source must be positioned to graze its surface, just as with a textured wall. Professional lighting design standards dictate that a dedicated art light should be positioned at a 35-degree inclination angle relative to the center of the painting. This angle is steep enough to cast defining shadows along the ridges of paint, revealing the artist’s every brushstroke and palette knife mark. Furthermore, the quality of the light itself is paramount. A light source with a high Color Rendering Index (CRI) of 95 or above is essential to render the painting’s colors with absolute fidelity.
As the illustration of a properly lit impasto surface shows, the interplay of light and shadow creates a visual journey across the canvas. The light is not just for seeing the artwork; it is an active partner in presenting it. By understanding and implementing this specific lighting geometry, a collector ensures that the full, multi-dimensional intent of the artist is honored and communicated, adding a profound layer of appreciation to the viewing experience.
How to Layer Textures to Avoid the ‘Boring Beige’ Trap?
A monochromatic room, particularly one in a neutral palette like beige or gray, risks feeling monotonous and uninspired—the dreaded “boring beige” trap. The solution is not to abandon the calming, sophisticated simplicity of a single color, but to build depth and interest through a deliberate layering of textures. This approach is central to contemporary luxury design; an interior design trends analysis for 2024 notes that monochromatic palettes are dominant, with designers artfully layering materials like plush velvets and textured linens to introduce a rich, tactile ambiance. Success, however, requires a more structured approach than simply mixing materials at random. It requires a sensory hierarchy.
This framework involves thinking of textures in tiers of impact. First, designate a ‘hero’ texture to act as the room’s focal point. This is your boldest statement, such as a rough-hewn stone accent wall, a wall with a sculptural plaster finish, or a large, deeply piled rug. This hero element establishes the room’s primary tactile identity. Next, add ‘secondary’ textures through major furniture pieces. This could be the open weave of a linen sofa, the soft nub of a bouclé armchair, or the smooth grain of a leather ottoman. These pieces should complement the hero texture in the same color family.
Finally, introduce ‘tertiary’ textural accents through smaller, easily changeable elements. These are the finishing touches: the subtle sheen of silk cushions, the cool smoothness of ceramic vessels, the glint of brushed metal sculptures, or the organic forms of foliage. The key is to create contrast in visual weight by pairing heavy, rough textures (like exposed brick or raw wood) with light, smooth ones (like polished concrete or gossamer silk curtains). This full-spectrum approach, extending beyond fabric to include rug pile depth, hardware finishes, and the gloss levels of different surfaces, is what creates a truly sophisticated and engaging haptic dialogue within a monochromatic scheme.
Key takeaways
- Material Choice Defines Character: Lime wash offers evolving patina (Wabi-Sabi) while Venetian plaster provides monolithic polish. The choice is about philosophy, not just aesthetics.
- Light is a Sculpting Tool: The angle and position of light (e.g., wall grazing) are as important as the texture itself, creating shadows that give surfaces life and depth.
- Texture is a Multi-Sensory Experience: Beyond touch, consider the acoustic properties of 3D panels and the visual depth of wallpaper to create a fully immersive environment, even in small spaces.
How to Apply Bold Wallpaper in Small Powder Rooms for Maximum Impact?
The powder room, often the smallest space in a home, presents a unique design opportunity. Its compact size and the temporary nature of its use make it the perfect laboratory for a bold, high-sensory design statement without the risk of overwhelming a primary living area. A powerful way to achieve this is by challenging a long-held design rule: that small rooms require small patterns. In reality, using a large-scale, bold wallpaper can create a “jewel box” effect, making the space feel more intentional, expansive, and luxurious. This approach embraces the room’s smallness and transforms it into an immersive, transportive experience.
This design choice aligns with current trends, which favor personality and charm. As noted by wallpaper experts Astek Home, “Whimsical wallpaper became a sought-after design trend in 2024, bringing playful charm and bold personality to interiors. Designs such as animal prints and bold graphics have been popular as ways to add personality and color to a home.” To maximize the impact in a powder room, designers often apply the wallpaper not just on all four walls, but also on the ceiling—the fifth wall. This envelops the user completely, erasing the room’s corners and creating a seamless, captivating world.
To further enhance the effect, select wallpapers that interact with light. Finishes with a subtle sheen or those containing metallic or mica elements will catch the light from sconces, adding a dynamic, shimmering depth that a simple matte paper cannot achieve. The success of this application, especially in a potentially high-humidity environment, hinges on meticulous surface preparation and the use of a high-quality adhesive. When executed correctly, a bold wallpaper doesn’t just decorate a powder room; it gives it a soul and a story, turning a utilitarian space into a memorable moment of design.
To truly master the art of the monochromatic interior, it is essential to revisit the core principle of textural hierarchy. By thoughtfully layering materials, you create a foundation upon which all other elements—lighting, art, and even acoustics—can build. Now that you have explored the specific applications, it is worthwhile to reconsider the foundational strategy of how to layer textures to avoid the ‘boring beige’ trap. Begin today by evaluating a single wall in your home, not for its color, but for its untapped potential to engage the senses and start a new, haptic dialogue.