The greatest risk in renovation isn’t the budget; it’s approving a design from a 2D blueprint you can’t truly understand, leading to costly changes or permanent regret.
- Virtual Reality allows you to test the real-world ergonomics of your design, like cabinet heights and walkway clearance, at a true 1:1 scale.
- Advanced rendering like ray tracing can accurately simulate how natural light will fall in your rooms throughout the day and year, eliminating guesswork.
- Walking through your virtual home provides a level of spatial confidence and emotional connection that flat paper plans or 3D images on a screen can never offer.
Recommendation: Use VR not just to see your design, but to inhabit it and physically validate every spatial choice before the irreversible process of demolition begins.
The moment arrives with a mix of excitement and anxiety: the architect unrolls a set of 2D blueprints. For many homeowners, this is where a dream renovation begins to feel like an abstract, confusing puzzle of lines and numbers. You nod along, trying to translate these flat diagrams into a three-dimensional space, secretly terrified of making a multi-thousand-dollar mistake because you couldn’t “read” the plans correctly. What if the island is too close to the counter? What if that new wall makes the living room feel dark and cramped? These are the fears that keep you up at night.
For decades, the standard response was to “trust the process” and hope for the best. But what if you could eliminate that leap of faith? What if you could walk through your new kitchen, open the virtual cabinet doors, and feel the morning sun streaming through a window before a single hammer has been swung? This is no longer science fiction. Virtual Reality (VR) is fundamentally changing the renovation landscape, moving beyond simple visualization to offer what can only be described as an embodied experience. It’s a tool that gives you, the homeowner, the power to test, feel, and validate your design with your own senses.
This guide is not about the novelty of VR. It’s a strategic manual for using this technology to gain absolute spatial confidence. We will explore how to navigate these virtual worlds without discomfort, how to use them to test real-world ergonomics, verify complex elements like sunlight, and even build your own model. This is your blueprint for making informed, embodied decisions and ensuring the home you build is the one you truly dreamed of.
To help you navigate this immersive new approach to renovation planning, this article breaks down the key steps and considerations. From overcoming the initial hurdles of VR to collaborating more effectively with your architect, you will discover how to leverage this technology at every stage.
Summary: How to Use VR Showrooms to Experience Your Renovation Before Demolition?
- How to Navigate VR Interiors Without Getting Motion Sickness?
- Using VR to Test Kitchen Cabinet Heights Before Ordering
- Ray Tracing in VR: Can It Accurately Predict Sunlight Patterns?
- Is Paying for a VR Walkthrough Worth the Extra Design Fee?
- SketchUp to VR: How to Walk Through Your Own DIY 3D Model?
- When to Knock Down Walls: The Best Season for Dusty Renovations
- How to Brief an Architect on a Collection You Don’t Own Yet?
- How to Collaborate With Architects to Design Art-Centric Homes?
How to Navigate VR Interiors Without Getting Motion Sickness?
The first time you step into a virtual model of your home can be breathtaking, but for some, it can also be disorienting. This feeling, often called cybersickness, is the brain’s confused response to perceived motion that doesn’t match physical movement. The good news is that it’s both manageable and often temporary. In fact, while research indicates that between 22-80% of VR users experience some form of it, technology and technique have evolved to significantly mitigate the issue. The goal isn’t to “tough it out” but to use smart navigation methods that keep you comfortable and focused on your design.
The key is to minimize the disconnect between your eyes and your inner ear. Instead of “smooth locomotion” (walking with a joystick like in a video game), which is a primary trigger for discomfort, most architectural VR experiences use a “teleport” function. You simply point a controller to where you want to go, and you instantly appear there. This feels less like walking and more like a series of conscious decisions about where to stand and observe, which is exactly what you need for design validation. This method eliminates the sense of motion that your body isn’t actually making, preserving your equilibrium.
To ensure a comfortable experience, you can take several proactive steps:
- Use teleportation: Stick to point-and-click teleporting for moving between rooms or across large spaces.
- Turn physically: When you need to turn, use a swivel chair to physically rotate your body. This perfectly syncs your physical and virtual movements.
- Find a static point: If you start to feel uneasy, look for a fixed, distant object in the virtual space and focus on it for a few seconds to “reset” your brain.
- Prioritize performance: Ensure the VR system is running at a high frame rate (ideally above 90 FPS). A smooth, stutter-free experience is crucial.
- Take breaks: Don’t try to spend an hour in VR on your first go. Start with 15-20 minute sessions and take the headset off completely during breaks.
By adopting these techniques, you transform VR from a potentially jarring experience into a powerful and comfortable design tool. You are not a passenger on a ride; you are a deliberate explorer, moving through your future home with intention and control. This shift in navigation allows you to focus all your energy on what truly matters: evaluating the space.
Using VR to Test Kitchen Cabinet Heights Before Ordering
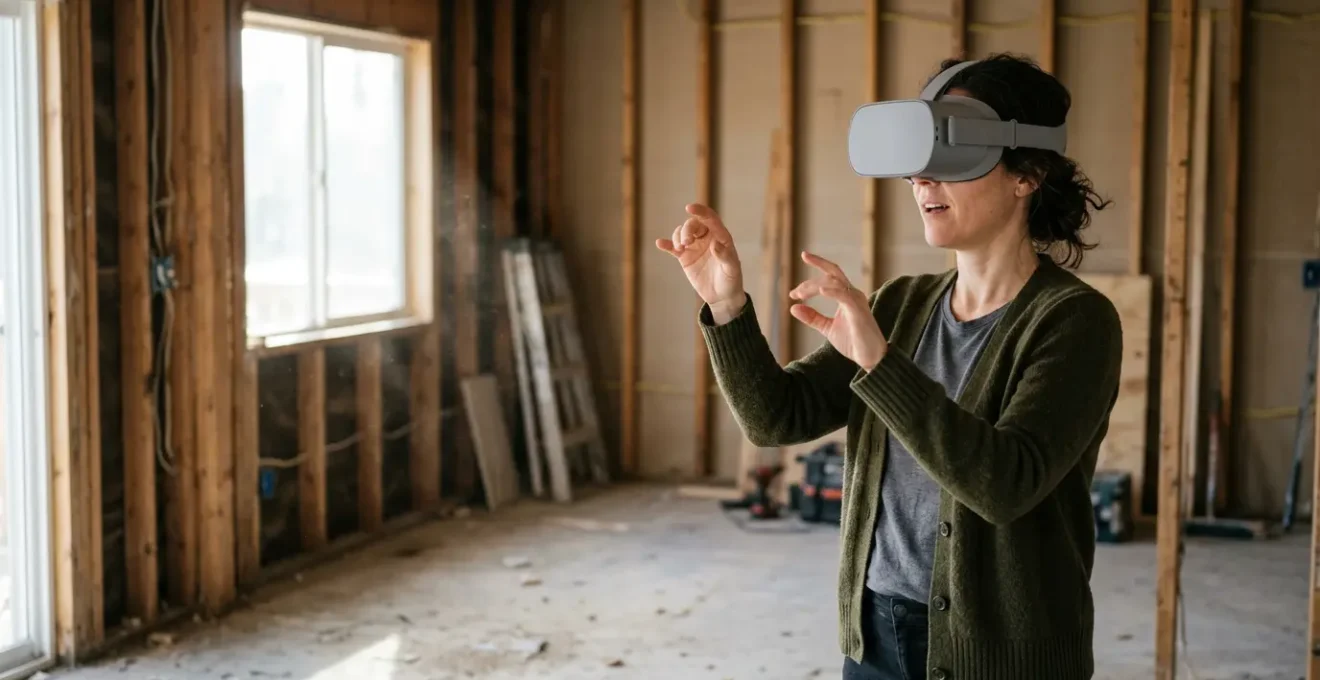
This is where VR transitions from a “cool-to-see” gadget to an indispensable “must-have” tool. Blueprints can tell you that a cabinet is 36 inches off the floor, but they can’t tell you how it feels for *you* to reach for a plate on the top shelf. An ergonomic simulation in VR allows you to physically perform these actions. You can stand at your virtual kitchen island and feel its width, walk the path from the fridge to the sink, and, most importantly, test the reachability of every shelf and drawer. This is no longer about imagining; it’s about doing.
As you see in the image, the process is intuitive. You physically reach up, and your virtual hand moves with you. Is the shelf too high? Do you have to stretch uncomfortably? Is there enough clearance to open the cabinet door without hitting the light fixture? These are the kinds of multi-million-dollar questions a simple physical test in VR can answer in seconds, saving you from a decade of daily annoyance or a costly post-construction fix. It’s the ultimate “try before you buy” for the most-used room in your house.
Case Study: VR Ergonomics Testing for Age-Friendly Kitchens
A recent study focused on older adults (aged 65-85) using an interactive VR system to evaluate kitchen designs. Participants could test maneuverability and accessibility of elements like cabinet heights in a virtual space before any physical construction. The findings were clear: the VR simulation gave participants significantly higher confidence in their design choices. By actively participating in the creation of their space and testing its functionality with their own bodies, they were able to ensure the final design truly met their ergonomic and functional needs, demonstrating VR’s power to create more user-centric and accessible homes.
This process builds a deep, personal spatial confidence. After reaching for a virtual cabinet, you’re not just agreeing to a number on a page; you’re confirming a physical experience. You know it will work because you’ve already done it. This validation is arguably one of the most valuable returns on investment VR can offer a homeowner.
Ray Tracing in VR: Can It Accurately Predict Sunlight Patterns?
Yes, and with astonishing precision. This is one of the most magical and practical applications of modern VR. The quality of natural light is a phenomenological element—it defines how a space *feels*. We’ve all been in rooms that feel “right” simply because of the way the sun hits them. But predicting this on a blueprint is an art reserved for the most experienced architects. For everyone else, it’s a gamble. Ray tracing technology, now available in VR walkthroughs, removes that gamble by simulating the physics of light with incredible realism.
Ray tracing isn’t just a prettier picture; it’s a sophisticated calculation. The software simulates individual photons of light from a virtual sun, positioned accurately based on your home’s geographic location, orientation, and the time of day and year. It calculates how these photons bounce, reflect, and refract off every surface in your model. The result is a scientifically accurate prediction of where shadows will fall, how light will filter through a window, and how a room’s brightness will change from 9 AM in June to 4 PM in December. The accuracy is no longer in question; validation testing demonstrated a difference of below 2% between ray-traced images and actual photographs in calculating how much sky is visible from a point.
Ray tracing supports daylighting, solar, and thermal analysis by accurately simulating how sunlight interacts with building geometry throughout the day and year.
– ArchiVinci Design Technology Team, What Is Ray Tracing? Why Does It Matter in Architecture?
Imagine being able to stand in your future home office in VR and confirm that you won’t have a terrible glare on your screen at 3 PM. Or verifying that the kitchen will be filled with bright, cheerful morning light, just as you hoped. You can test the placement of windows, the size of overhangs, and the effect of a skylight not as architectural features, but as active components of your daily life. This is pre-construction validation at its most powerful, ensuring the intangible atmosphere of your home is designed with as much intention as its physical layout.
Is Paying for a VR Walkthrough Worth the Extra Design Fee?
This is a fair and critical question. When you’re already managing a large renovation budget, any additional cost needs to be justified. A professional, interactive VR walkthrough is not a free add-on; it requires specialized software, powerful hardware, and hours of an expert’s time to convert architectural models into an optimized, walkable experience. While prices vary widely based on project size and complexity, industry pricing data shows that interactive 360° VR tours can range from $3,000 to $10,000. So, is it worth it?
To answer that, you have to weigh the cost of the VR service against the cost of a mistake. Consider the price of a “change order” during construction—a request to move a wall that was just framed, re-route plumbing that’s already been installed, or replace kitchen cabinets that are the wrong height. These changes are not just expensive in materials and labor; they cause delays that have a cascading effect on the entire project timeline. A single significant change order can easily exceed the cost of the entire VR walkthrough that would have prevented it in the first place.
Case Study: VR Visualization ROI in Pre-Leasing
A Chicago firm developing a 6,000 sq ft office building invested $6,000 in a full VR tour created from their Revit models. This allowed them to give prospective tenants immersive walkthroughs of the space while it was still under heavy construction. The ability for tenants to experience the final layout, materials, and views with such realism was a key factor in their decision-making. The result? The building was 70% leased *before* renovations were even complete, proving a massive return on the initial VR investment by dramatically shortening the time to revenue generation.
For a homeowner, the “return on investment” isn’t in lease revenue, but in certainty and the avoidance of regret. The fee for a VR walkthrough is an insurance policy against the soul-crushing feeling of standing in your finished home and saying, “If only I had realized…” It’s the price of transforming yourself from a passive spectator of the design process into an active, confident participant who has tested and approved every crucial corner of their future home.
SketchUp to VR: How to Walk Through Your Own DIY 3D Model?
While high-end architectural firms offer polished VR experiences, what about the hands-on homeowner who has modeled their own renovation in a program like SketchUp? The great news is that the path from a DIY 3D model to an immersive VR walkthrough is more accessible than ever. With a consumer-grade VR headset (like a Meta Quest) and the right software plugins or companion apps (such as IrisVR, Enscape, or Twinmotion), you can step inside your own creation. This empowers you to iterate on your design ideas in a truly spatial way.
However, simply exporting your SketchUp file and opening it in VR will often lead to a glitchy, disorienting, or slow experience. The key to a successful DIY VR walkthrough is model optimization. A model designed for 2D viewing on a screen is not the same as one designed to be rendered in stereo at 90 frames per second inside a headset. Before you export, you must clean up and prepare your model specifically for the demands of real-time rendering. This involves simplifying geometry, managing textures, and ensuring the model is built to a perfect 1:1 scale to feel realistic.
Think of it as packing a suitcase for a trip. You don’t just throw your entire wardrobe in; you select and fold what you need. Similarly, you need to purge your 3D model of any unnecessary data that will weigh down the VR experience. This preparation is the most critical step in ensuring a smooth and useful DIY walkthrough.
Your Pre-Flight Checklist for SketchUp to VR
- Fix Normals: Check for and fix any “flipped normals” (blue or gray faces) that can make walls appear invisible or inside-out in VR. All forward-facing surfaces should be white.
- Reduce Polygons: Simplify excessively complex geometry. Remove fine details on furniture or fixtures that are far away and won’t be noticed, as these dramatically increase the rendering load.
- Verify Scale: Measure a known object, like a standard doorway, to confirm it is the correct size (e.g., 36 inches wide, 80 inches tall). This ensures your model is at a precise 1:1 scale to avoid a “dollhouse” effect.
- Purge Unused: Use SketchUp’s “Purge Unused” command to remove all leftover components, materials, and styles from your model, which will significantly reduce the file size.
- Optimize Textures: Keep texture image sizes reasonable, typically no larger than 2048×2048 pixels. High-resolution textures are a primary cause of poor VR performance on consumer headsets.
By following this optimization checklist, you are preparing your model to fly smoothly in the virtual world. This effort ensures that when you finally put on the headset, you can focus on evaluating your design, not fighting with a laggy and broken experience.
When to Knock Down Walls: The Best Season for Dusty Renovations
Traditionally, contractors might suggest spring or fall for major renovations, citing milder weather for open walls and better ventilation for dust control. While there’s logic to this, VR technology introduces a new dimension to this planning that makes you less dependent on the calendar: logistical and phasing simulation. The more complex question isn’t just *when* to start demolition, but *how* to manage the chaos it creates within your home, especially if you plan to live there during the process.
Using your VR model, you can do much more than approve the final design; you can collaborate with your architect or builder to plan the entire sequence of operations. This means visualizing and defining construction zones, planning temporary dust barriers, and plotting out pathways for workers to move materials without tracking debris through finished areas of the house. This level of meticulous planning can transform a chaotic and dusty ordeal into a controlled, predictable process.
The visual metaphor above illustrates this perfectly. In VR, you can literally “wall off” the living area from the construction zone, testing the placement and effectiveness of these barriers. You can walk the path from the front door to the kitchen and see if it remains clear and livable. This virtual rehearsal allows you to identify potential bottlenecks and sources of disruption before they happen in the real world. By optimizing the phasing and containment strategy, you can make the renovation process more bearable, regardless of the season you start it in. The goal is to use technology to create a bubble of order amidst the necessary chaos of demolition.
Ultimately, VR planning gives you control over the renovation *process*, not just the outcome. When you can clearly visualize and agree upon a phasing plan, the best season to start becomes “as soon as the plan is locked.” Your confidence comes from the quality of the plan, not the weather forecast.
How to Brief an Architect on a Collection You Don’t Own Yet?
This is a classic design dilemma for art lovers and collectors. You’re designing a home meant to last for decades, but your art collection is a living, evolving entity. How do you design a niche for a sculpture you haven’t bought yet, or plan a wall for a painting you’ve yet to discover? Trying to communicate these abstract, future needs to an architect using words alone is incredibly difficult. This is where VR becomes a powerful tool for communicating intent.
You don’t need a perfect 3D model of the future artwork. Instead, you can work with your architect to place simple, scaled “massing models”—basic shapes like cubes, cylinders, and planes—into your virtual home. A 6-foot tall rectangular block can represent the large-scale canvas you dream of owning. A 3-foot wide cylinder on a pedestal can stand in for a future sculpture. By placing these placeholders, you can then use VR to answer critical spatial questions. Is the hallway wide enough to walk around the sculpture? From the sofa, is the sightline to the “painting” clear, or is it blocked by a doorway? Will the afternoon sun hit it directly (which could be bad for the artwork)?
This method is about testing the spatial relationships and the feeling of the space, not just the aesthetics. It’s a principle well-understood in other areas of design.
VR allows my clients to fully appreciate the kitchen beyond the aesthetics; they get a better sense of the layout and can understand the configuration and flow which are so important for ergonomically designed spaces.
– Michael Burr, Kitchen Designer, Using Virtual Reality for Kitchen Design and Renovations
By applying this same logic of testing “configuration and flow,” you are no longer briefing your architect on an object. You are briefing them on the *volume*, the *presence*, and the *experience* of the art you intend to live with. This gives them the concrete data they need to design the perfect lighting, sightlines, and circulation paths, creating a home that is ready to embrace your collection as it grows.
Key takeaways
- VR is a tool for experiential validation, not just visualization. It’s about feeling the space, not just seeing it.
- Highly accurate simulations for ergonomics (reach, clearance) and natural light (ray tracing) are possible and remove critical guesswork.
- The cost of a VR walkthrough should be weighed against the far greater cost of change orders or living with a design regret.
How to Collaborate With Architects to Design Art-Centric Homes?
The relationship between a homeowner and an architect is a partnership, and the best partnerships are built on clear, unambiguous communication. For generations, blueprints have been the primary language of that communication, but as we’ve seen, it’s a language many clients don’t speak fluently. Virtual Reality introduces a new, universal language: the language of direct experience. When designing a home around specific passions like art, this shared experiential ground becomes the key to a truly successful collaboration.
Instead of you trying to interpret the architect’s lines, and the architect trying to interpret your words, you can both stand in the same virtual room and point. “This wall feels too short for the triptych I envision.” “What if we moved this light fixture to avoid a glare on the sculpture’s surface?” The conversation becomes immediate, intuitive, and incredibly productive. The enhanced realism of modern VR, with accurate reflections, refractions, and dynamic lighting, means you are collaborating on the real-world atmosphere of the space, not just its dimensions.
This process transforms the design review from a formal, often intimidating meeting into an exciting, iterative workshop. You can explore options together in real-time, building on each other’s ideas. This collaborative flow builds trust and ensures that the final design is not just the architect’s vision or the client’s wish list, but a true synthesis of professional expertise and personal desire. The end result is a home that doesn’t just contain art, but elevates it, because every wall, every window, and every light was considered and validated through a shared experience.
Therefore, when you next embark on a renovation, the most important question you can ask your architect is not just “When can I see the plans?” but “When can we walk through the model together?” This is the new standard for collaborative, confident, and regret-free design.